
 Tags: Attachments, D365FO, DocuSign, Electronic signature, Full Edition, Power Automate, SharePoint

In our previous article, we showed the full signing flow in action — from printing a PO in D365FO to receiving the signed document back automatically. If you haven’t seen it yet, you can watch the walkthrough and video demo here: 👉 From Print to Signed: Docentric and DocuSign Flow in Action
Now it’s time to build it.
In this guide, you’ll configure the complete end-to-end signing process using Docentric, SharePoint, Power Automate, and Docusign.
Here’s what will happen:
- A PO confirmation is printed.
- It’s saved to SharePoint with signer metadata.
- Power Automate sends it to Docusign.
- The signed PDF (with certificate of completion) comes back automatically.
- The attachment is updated in D365FO.
No custom code. No manual steps or emails. No lost documents. No chasing signatures.
And once it works for POs, the same pattern applies to quotations, agreements, invoices, or any Docentric-enabled report.
Let’s configure it step by step.
Prerequisites
To follow this guide, you need:
- A D365FO environment linked to Dataverse.
- A SharePoint site to store documents.
- Docentric AX Full Edition.
- A Docusign developer account.
- Power Automate with proper license.
With these ready, it’s time to get hands-on.
D365FO setup
Configure a document type
You need the document type to get your PO confirmation saved on SharePoint with the configured metadata, which will then trigger the Power Automate flow.
Configure Print Management
First we start to create or modify Print management settings for Purchase Order document.
Set the following:
- Print destination: Docentric File
- Enable Save to attachments
- Select your Document type created in the first step.
- Select Source table as Record type (to create the attachment for the PurchTable table record).
- Ensure you always keep only one version of each confirmation journal by selecting If Attachment already exists with Replace existing.

Create a User-defined placeholder
To ensure unique filenames for printed documents, create a User-defined placeholder for the confirmation journal number (multiple confirmations per PO are common) or just use our ready-made custom placeholder @PurchId@.
Define output filename and format
The only thing left is to go to up in the File print destination to Output filename and format section and set:
- The Output filename to “Purchase order- @PurchId@.pdf” to be unique for each confirmation journal.
- Change the Output file format to PDF.
Click OK and save your configuration.
Configure SharePoint metadata for the Signer
Before Power Automate can send anything to Docusign, it needs to know one simple thing: who should sign the document?
Instead of hardcoding this or maintaining a separate mapping, we let the PO drive the process. Docentric makes this easy by saving additional metadata to SharePoint together with the generated PDF.
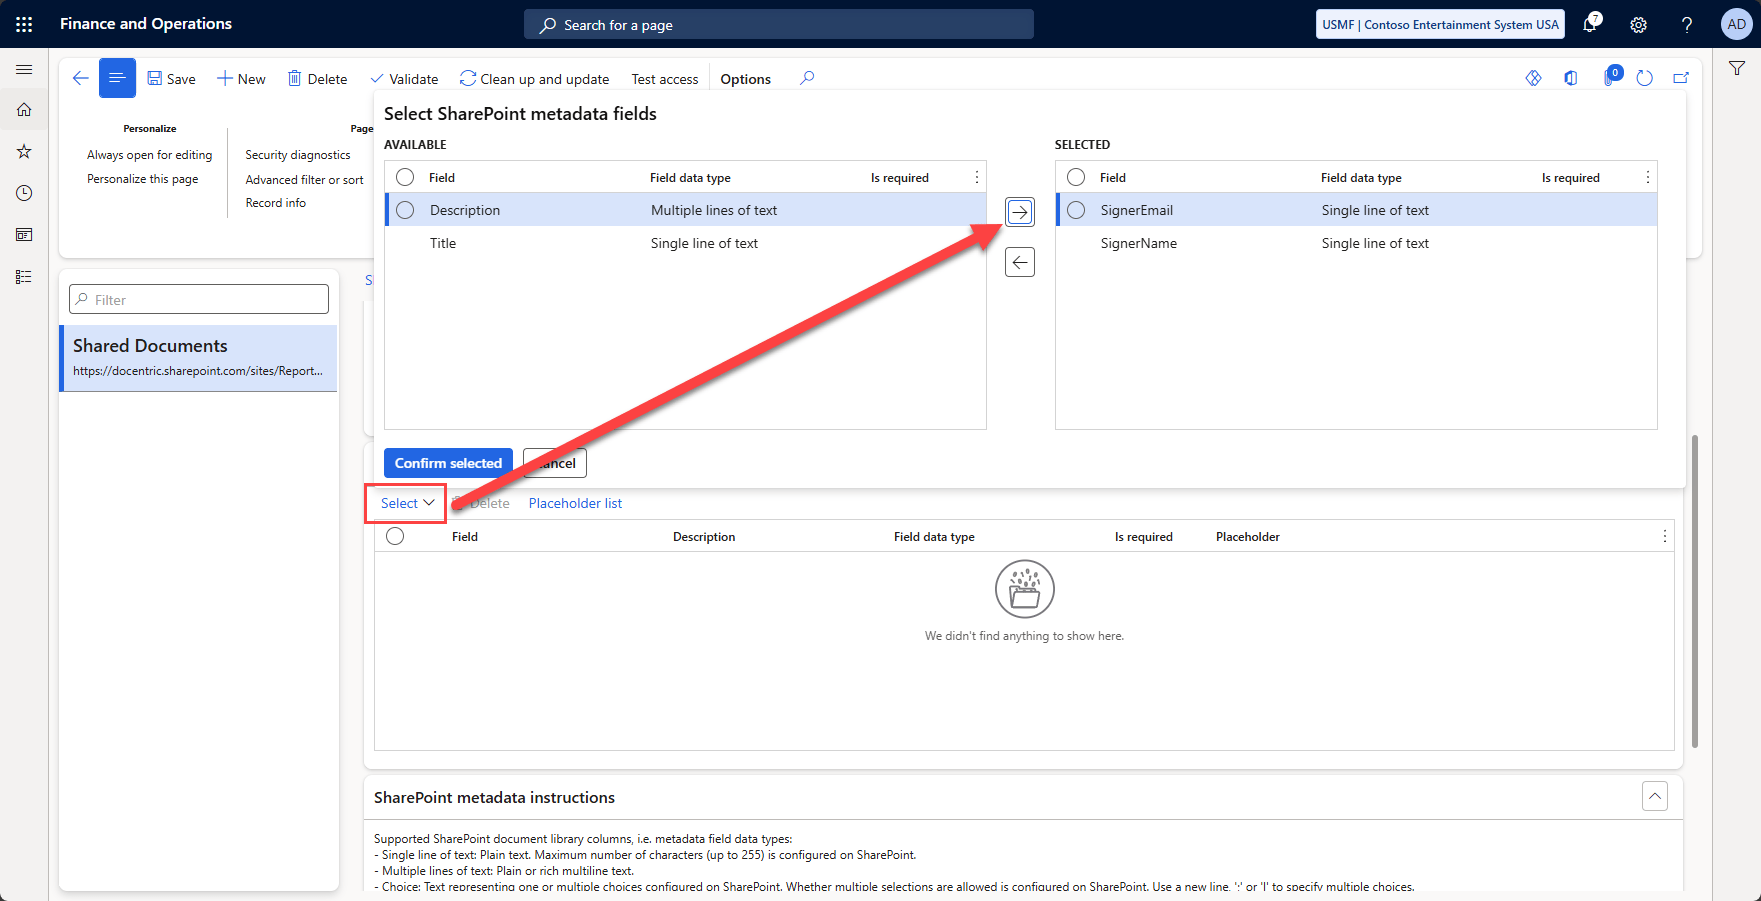
When the PO confirmation is printed and stored in SharePoint, we also store two extra metadata fields:
- SignerEmail: @OrderEmail@
- SignerName: @VendContactName@
These values come directly from the vendor contact defined on the purchase order. No manual input. No duplication.
Now here’s the nice part: when the file appears in SharePoint, Power Automate reads these metadata fields and passes them straight into the DocuSign connector as recipient details. The envelope is created with the correct signer automatically.

Learn more →
Create Power Automate flows
Two Power Automate flows are required:
- Start signing: triggered when a file is created in SharePoint and sends the document to Docusign.
- Process result: triggered when signing is completed and updates the SharePoint file with the signed PDF.
Flow 1: Start the signing process using Docusign connector
Create a new automated cloud flow, name it "Docusign signing process".
Step 1: Define a trigger when the flow will start
Select the trigger When a file is created (properties only) from the SharePoint connector. This will retrieve the properties of the file that’s been created in SharePoint, including our fields with the signer fields.
Configure Site, Library, and Folder to match your library.
Step 2: Retrieve file content with metadata
Add the action Get file content from the SharePoint connector. Again, select the site, and as the File Identifier field the Identifier field from the trigger.
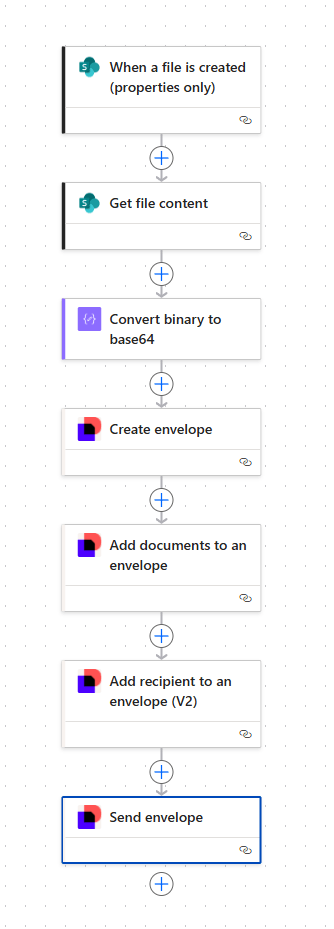
Your flow should look like this now:

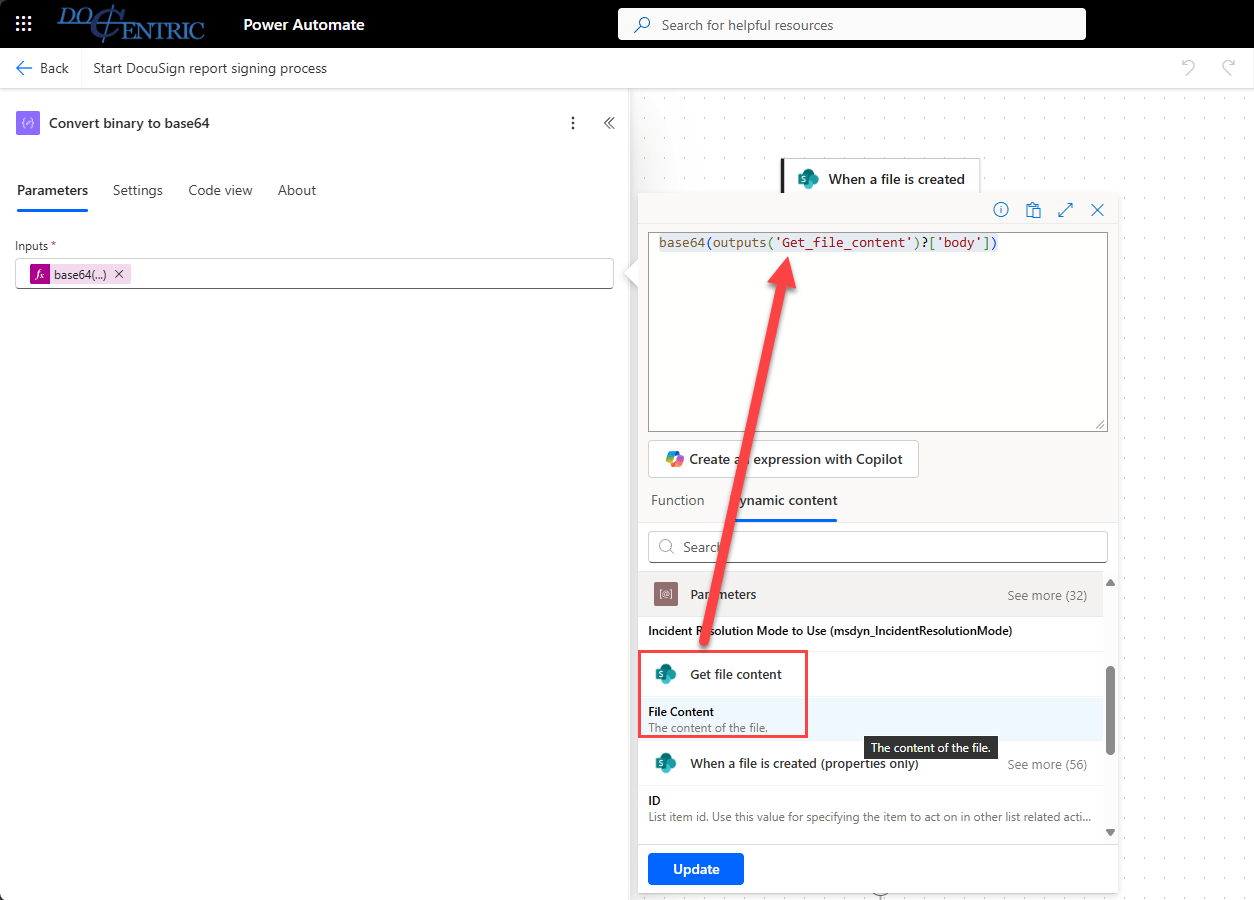
Step 3: Convert file to Base64
The file content is returned as binary. You need to convert it to a base64 string.
Add a Compose action with the following expression:
|
1 |
base64(outputs('Get_file_content')?['body']) |
Make sure the Get_file_content text in the expression matches the name of your Get file content action from the previous step. Alternatively, you can enter just the base64 expression, then look for the output of the action in the Dynamic content tab:
Step 4: Create the Docusign Envelope
For testing purposes, use the Docusign Demo connector:

Make sure that, when you select triggers or actions, you’re choosing the ones under Docusign Demo, or you won’t be able to create the connection to the Docusign connector with your developer account.
Creating a signable document for Docusign requires several steps. First, you must create an envelope. This is an electronic container used to send documents for signature.
The first time you use an action, you will be prompted to create a connection. Use your developer account’s credentials.
Add a Create envelope action with the following parameters:

- Subject: the subject of your document.
- Account: your developer account company.
- Email body: the text displayed to the signer. In my case I'm selecting the name of the user that created the file, and I'm also adding the name of the file.
- Custom Field: this parameter is optional, but it’s important to you. Set this to the filename. You use it in the second flow to update the file on SharePoint.
Step 5: Add document to Docusign Envelope
Once you create the envelope, you need to add documents to it: your file for the PO confirmation.
Add an Add documents to an envelope action and use these parameters:
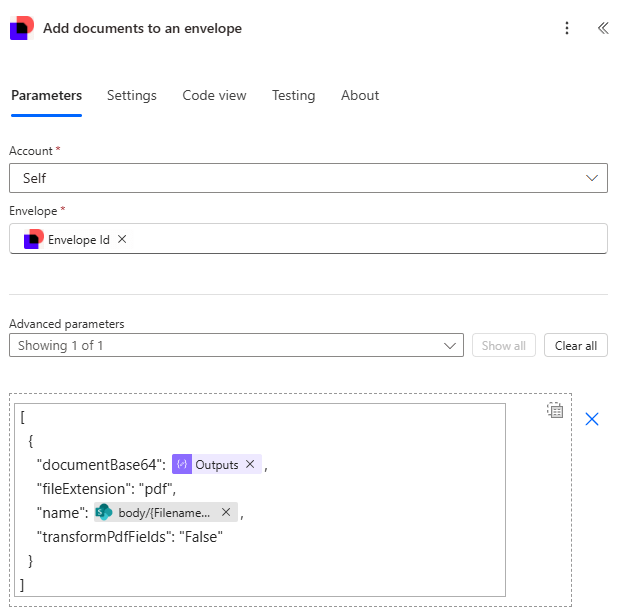
- Account: same as in the previous step.
- Envelope: the Envelope Id from the envelope we've just created.
-
Advanced parameter: complete the JSON text with:
- Output of the compose action where you converted the binary file to base64.
- The filename.
The document is added to the envelope. Like a physical letter, now you need a recipient.
Step 6: Add recipient as a signer
Add an Add recipient to an envelope (V2) action with the parameters:
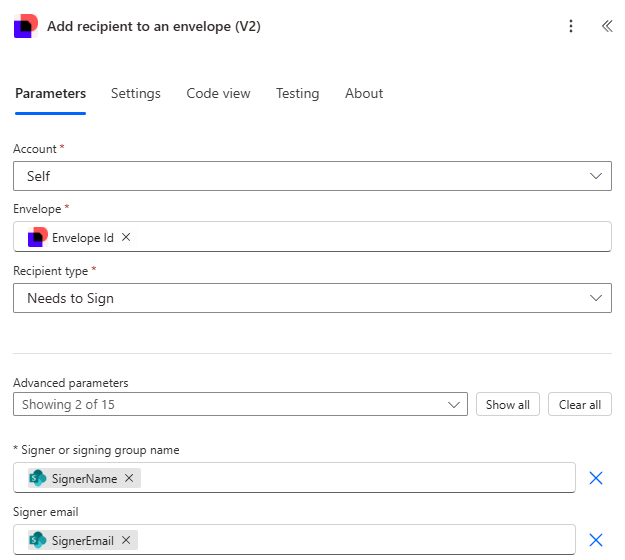
- Account: same as in the previous step.
- Envelope: same as in the previous step.
- Recipient type: this depends on what you want to achieve. For the example it's Needs to Sign.
- Signer: the SignerName property of the trigger step.
- Signer email: the SignerEmail property of the trigger step.
Step 7: Start the signature process by sending the envelope
And finally, you can use the Send envelope action just by selecting the Account and Envelope as in the previous steps.
Your complete flow should look like this:
Flow 2: Process signed document and update file
This flow is a bit shorter and straightforward.
Step 1: Define a trigger to start the process on Envelope Completion
To capture the outcome of the signing process, we'll use the When an envelope status changes (Connect) (V3) trigger with these parameters:

- Connect name: a name to identify the action, like EnvelopeCompleted.
- Envelope event: the event you want to monitor. In our case, that's envelope-completed, which triggers when all signers complete signing.
- Account: the name of your developer account. The same as in the previous flow.
Step 2: Get signed document
The next step is getting the document of the envelope that triggered the flow. Select the Get documents from an envelope action with the parameters:
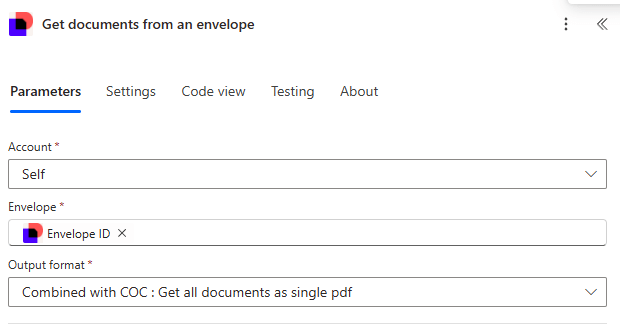
- Account: same as before.
- Envelope: the Envelope ID parameter returned from the trigger.
- Output format: Combined with COC: Get all documents as single pdf. This returns the signed document plus the Certificate of Completion (COC) that displays the history of the document. This is especially useful for auditing.
Step 3: Parse custom field
Then you need to turn the Custom Fields you set in the first flow into a readable format. Add a Parse JSON action with the Custom Fields returned from the trigger and this schema:
|
1 2 3 4 5 6 7 8 |
{ "type": "object", "properties": { "Custom Field": { "type": "string" } } } |
Step 4: Update signed file in SharePoint
This gives us a single field with the filename, so you can update the correct file in SharePoint. To do so, add the Update file action from the SharePoint connector with these parameters:
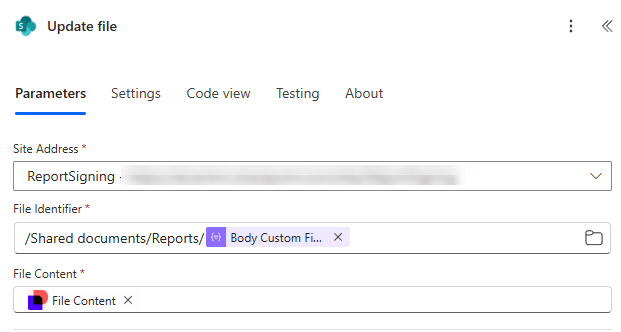
- Site address: the site you're using to store the documents.
- File identifier: the path plus the filename that's returned from parsing the Custom Fields JSON.
- File Content: the content of the file returned by the Get documents from an envelope action.
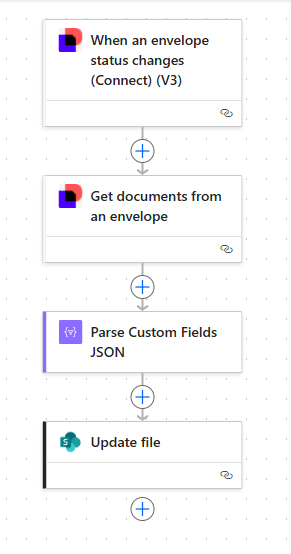
Your final flow should look like this:
Test the process
With both flows ready, do a test run. You can slightly modify an already confirmed PO or create and confirm a new one.
Just remember that you must specify a contact in the PO header:
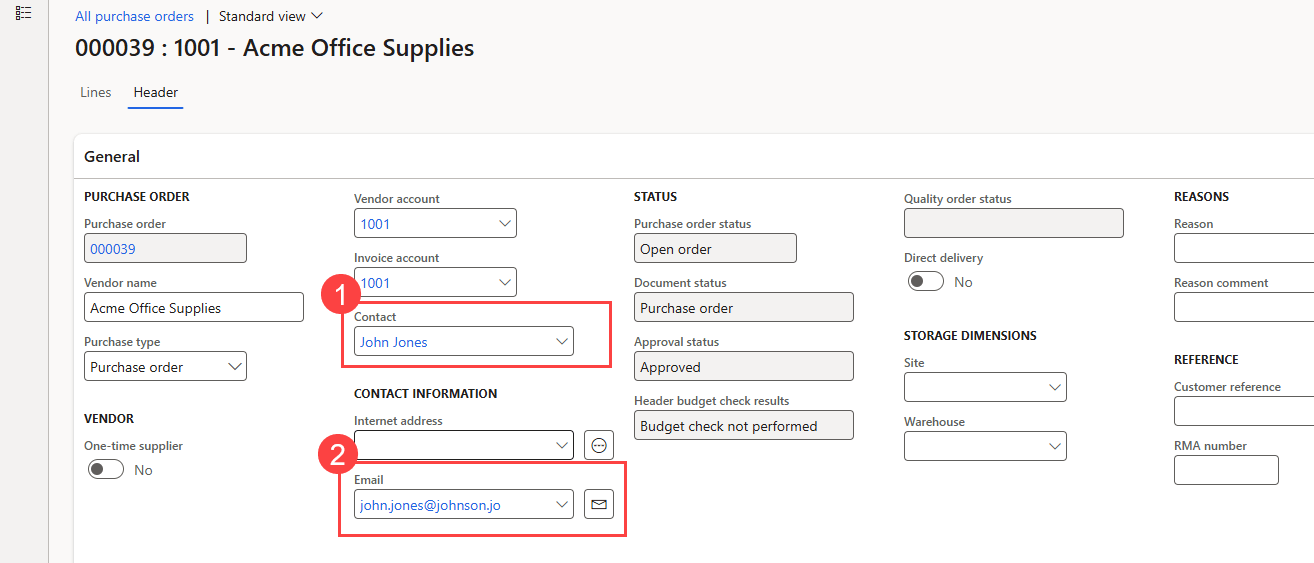
- Contact will be used as the signer's name.
- Email as signer email.
Open the PO confirmations journal from the top menu in Purchase > Journals > Purchase order confirmations.
In the journal, click the Preview/Print button and select Use print management. This will use the Print Management setup you created and save the file to SharePoint. It will also be displayed in the PO form as an attachment.
Once the first flow runs, the Docusign process will start, and the signer will receive an email from Docusign.
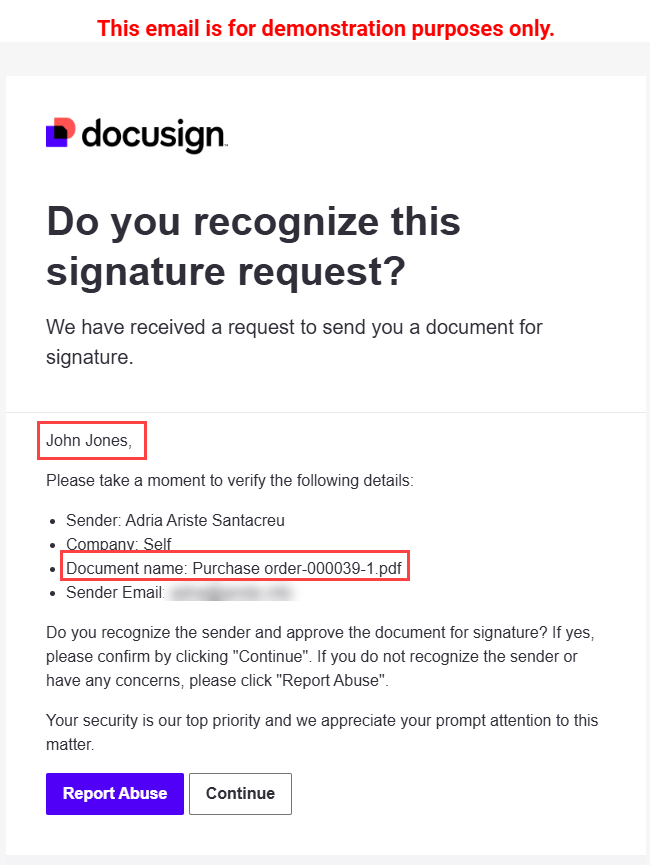
You can see that the signer's name passed from the contact appears on top of the email, as well as the filename that must be signed.
The next step is for the signer to complete the document:

Once complete, the sender and the signer will receive an email with a copy of the signed document, and the second Power Automate flow will trigger, updating the file on SharePoint.
If you go to the purchase order attachments, you will see the updated document with the signatures and the certificate of completion:

And just like that, you have a fully automated process where our documents are signed and stored as attachments.
Using Docusign tabs with a Docentric template
One of the features that Docusign offers is tabs. If you've ever had to sign a document, you may have noticed them. They're tags that point to the fields the signer must complete.
![]()
You can accomplish this for Docentric templates by making some small changes to the template design.
Update the Docentric template
To add tabs to the document, Docusign expects anchor text where you want their fields to appear. To accomplish this, you do the following on the PO document:
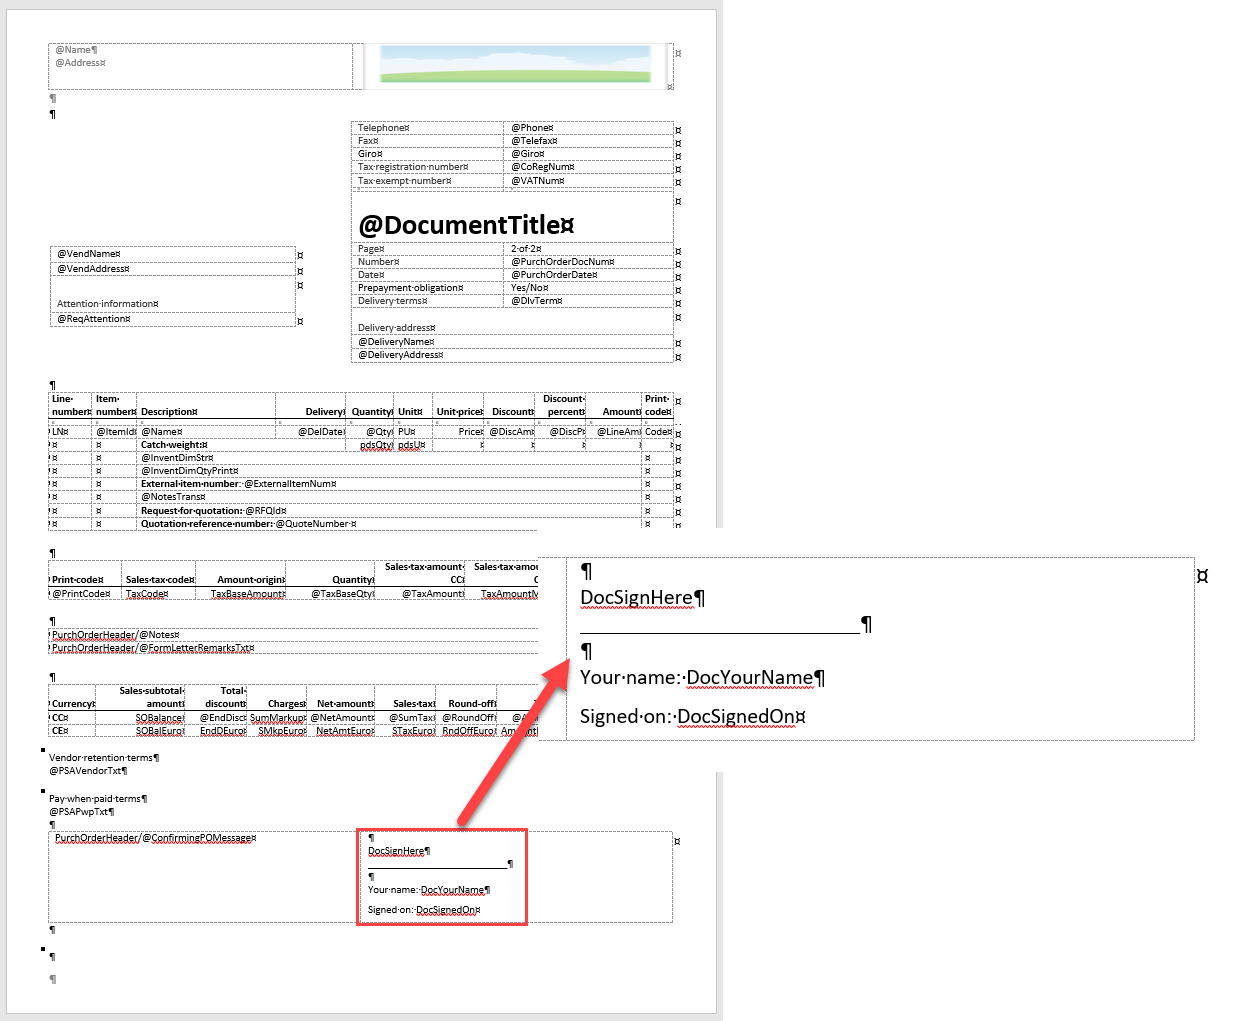
These anchor fields are regular text fields that replace Docusign tabs when the envelope is sent. In your case, you have:
- DocSignHere: the location of the signature.
- DocYourName: the name of the signer.
- DocSignedOn: the date the document was signed.
There's one more thing to do here. Because Docusign does not remove anchor text automatically, hide it by setting the text color to match the background.
So, it looks like this:

The text is hidden, but you can see it's still there because the spell-check highlights it.
Save the template and update it in the report settings.
Add tabs in Power Automate
You will add some extra steps to the first Power Automate flow to enable the tabs.
After the Add recipient to an envelope (V2) action, add a new Add tabs for a recipient on an envelope action:

You can see the usual fields at the top of the image: Account, Envelope, and Recipient. These will come from the previous steps you took.
Then you have the Tab type field. For the signature, you need this to be of type Signature.
In TabDetails/tabs, enter:
- Anchor String: the text you set on the template. In the signature case, DocSignHere.
- Optional: flag indicating whether the field can be left empty when signing in Docusign.
- Label: the text that will appear on the Docusign signing UI.
- Anchor X Offset: horizontal offset. To move the field so it fits perfectly with the anchors in our document.
- Anchor Y Offset: vertical offset.
You can add multiple tabs in an action, but each action adds tabs of a single type. Add additional Add tabs actions for Full Name and Date Signed.
Once you add them, your flow should look like this:
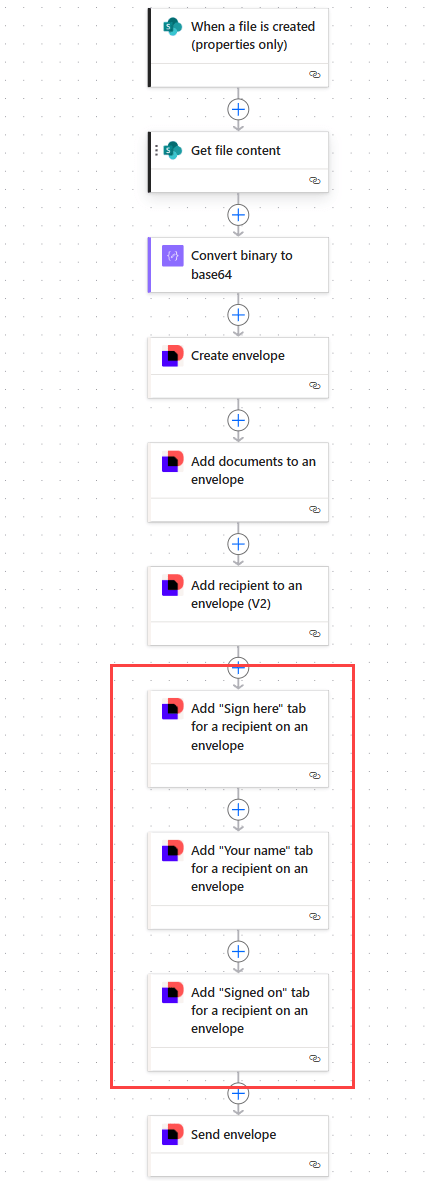
You can see the flow is the same as the original one, but with the three extra steps for the anchor tabs.
Now if you run the process again and get to the signing process, you will see the tabs:
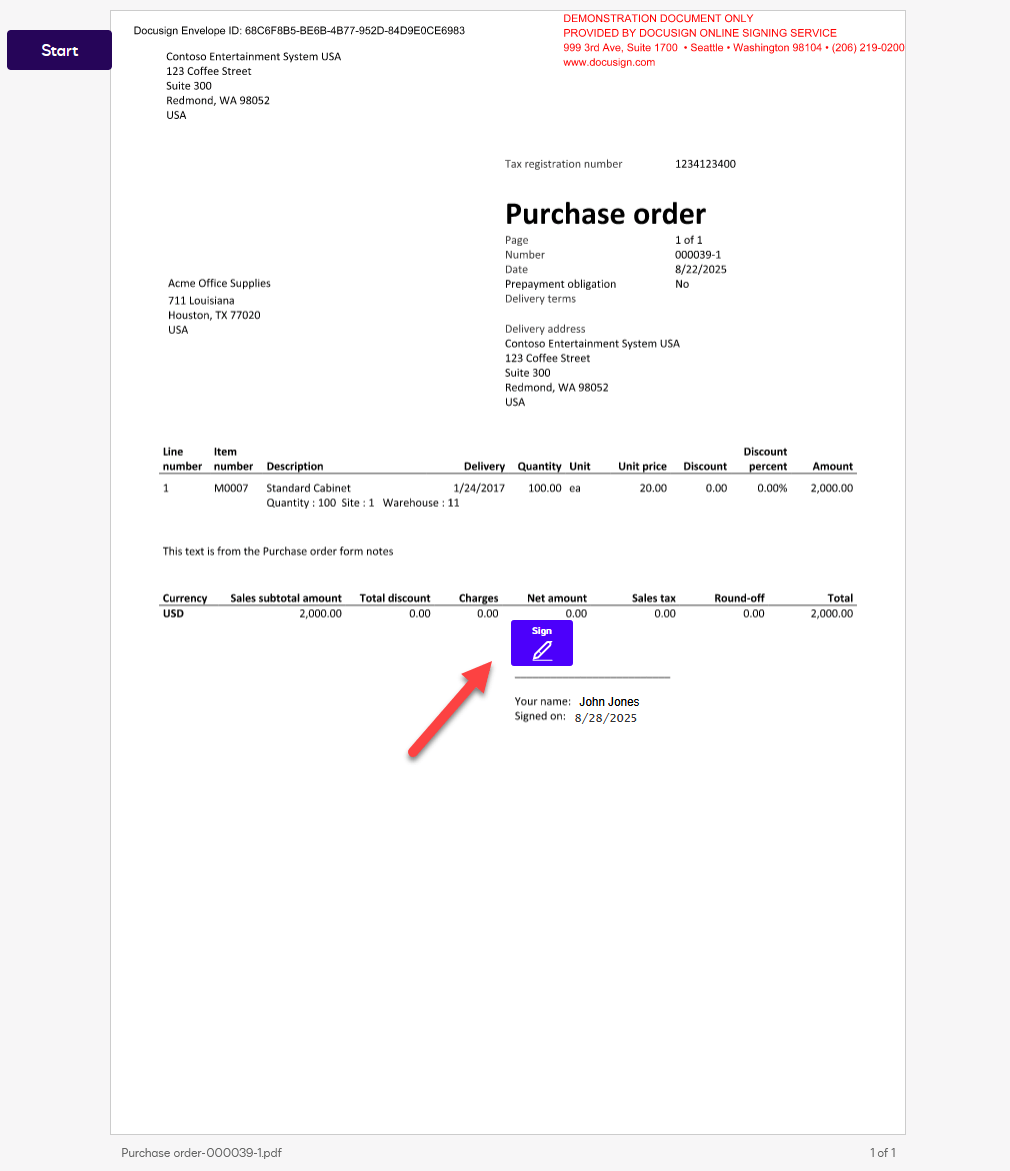
If you previously used Docusign and completed your name details, the name field will be populated like in the image, and you just need to click the Sign button.
Otherwise, you will be able to add your name, initials, and signature:

Once you click the Adopt and Sign button, Docusign applies them to the anchor fields:

Once again, the document will be updated in SharePoint, and you'll be able to access it from the PO's attachments.
Import the solution
We've prepared a solution containing the Power Automate flows so you can import them into your Dataverse environment. Thanks to this, you only need to prepare the setup on the D365FO and SharePoint side.
Solutions are packages that group elements to be moved between environments. In this case they contain the Power Automate flows, connection references, and environment variables.
There are two types of solutions in Dataverse:
- Unmanaged: they contain the elements and let you edit them. Unmanaged solutions are usually meant for development purposes.
- Managed: they also contain the elements, but you cannot edit them directly. If you edit any, it will create an unmanaged customization on top of the managed element. A managed solution is often used to move code from the development flow to a sandbox or production environment.
You can download the unmanaged solution from the GitHub project.
The following steps are the same regardless of whether you import a managed or unmanaged solution. To import the solution:
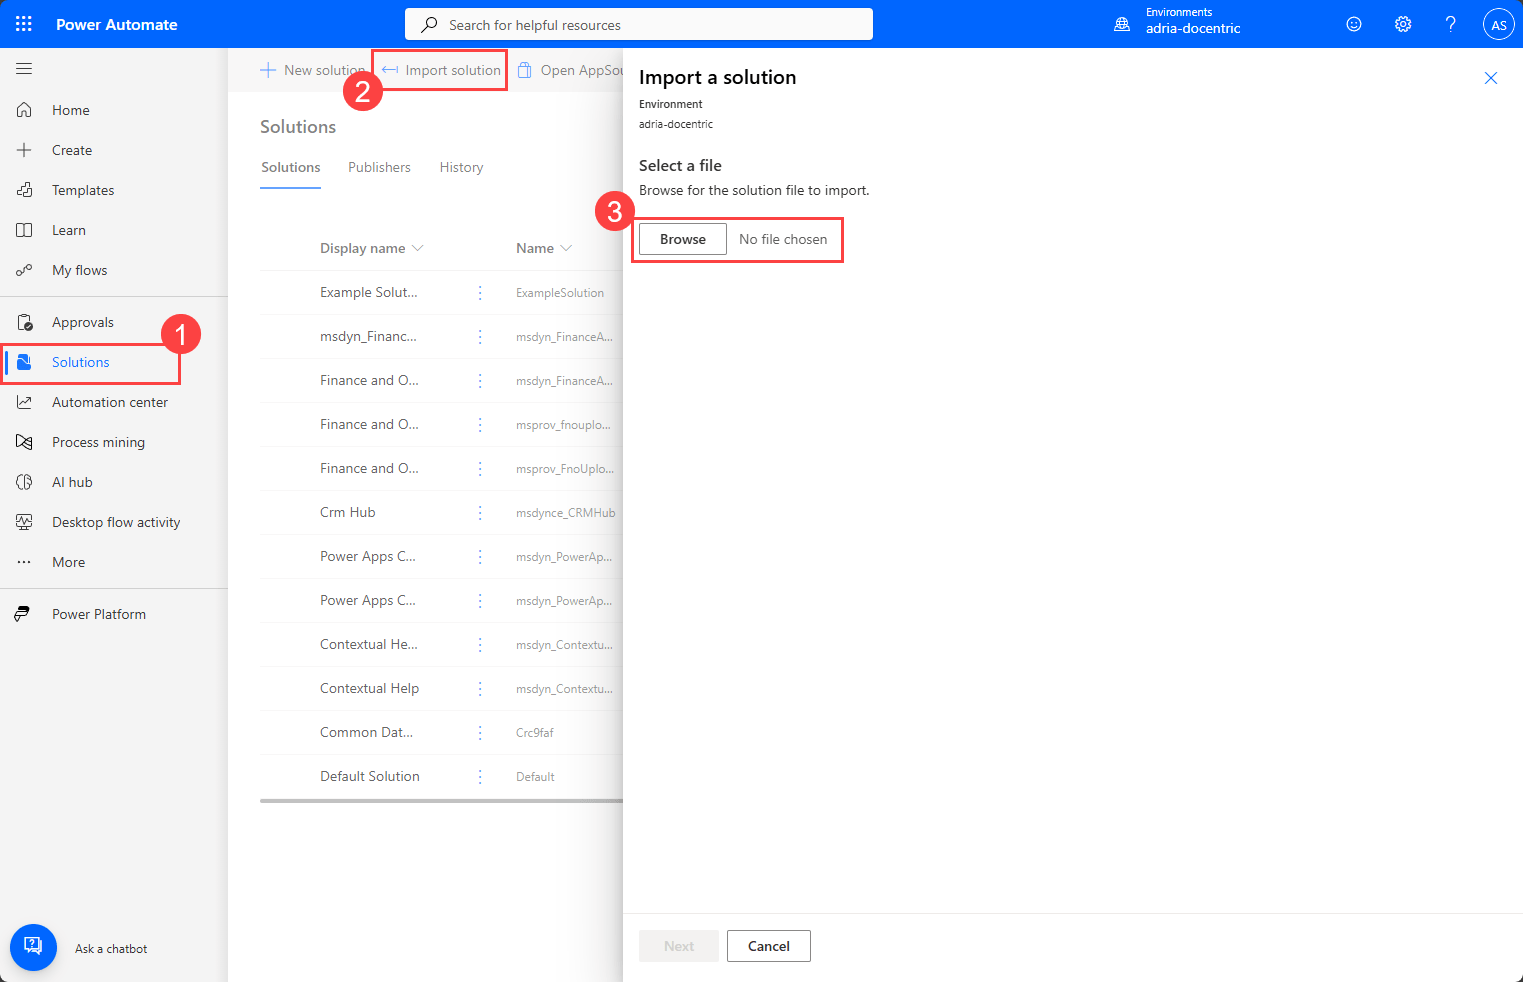
- Go to the Solutions menu on the left pane.
- Click the Import solution button on the top menu.
- Click the Browse button and select the solution ZIP file.
Click the Next button, and in the next dialog, click it again. Now you need to configure the connections.

If your current user is valid for any of the connections, it will log in automatically; otherwise, you need to do it manually. Click the Next button once more.
As a part of the solution, you have 4 environment variables. You must define their value now.

Complete the fields with these values:
- DocusignAccountId: this corresponds to the API Account ID of your Docusign developer account. You can find it under the My Apps & Keys menu in the Docusign developer console.
- SharepointSiteUrl: The URL of the site you will use.
- SharepointReportFolder: The folder where reports are printed. By default it's set to /Shared Documents/Reports.
- SharepointLibraryName: the name of the site's library. By default it's set to Documents.
Finally, click the Import button, and you're all set. When you print your first purchase order or quote, it will be signed.
Conclusion
That's the pattern:
D365FO » Docentric print destination » SharePoint » Power Automate » Docusign » back to the PO.
No custom code. Full traceability. Fully scalable.
Use it for purchase orders, sales quotations, agreements, or any Docentric-enabled document. Prefer other signing solutions? Your Docentric setup doesn't change.
Import the solution, do a quick test print, tweak the template, and you're ready to push this to POs and beyond!
And don't forget about Docusign's Go-Live process before you use the solution in production.