
 Tags: D365FO, Electronic reporting, Full Edition, Invoice, Template design
You're sending an invoice to a customer in Germany, another to a customer in France, and a third to a customer in the United States. Each customer expects to receive an invoice with Terms and Conditions written in their own language. To meet legal requirements and customer expectations, this content must be clear and localized.
You might think this is only possible with custom code. But what if I told you there’s a way to do it without writing a single line of X++?
In this tutorial, we assume you already have a multilingual invoice report set up. Now, we’ll focus on automatically attaching the correct Terms and Conditions document from attachments, based on the customer’s language. This setup is especially useful if you frequently update your Terms and Conditions and want the latest version to be used across all invoices.
With Electronic Reporting (ER) and Docentric AX Full Edition, power users and consultants can configure this behavior without developer support.
What We Will Do in This Article
In this article, we will walk through a real example: a Sales Invoice that includes Terms and Conditions in the customer's language.
Here is the process we will follow:
- Store each version of your Terms and Conditions as a Word file (one per language) and attach them to the legal entity.
- Use Electronic Reporting to select the correct file automatically based on the invoice language.
- Design the final invoice with Docentric Designer and include the Terms and Conditions in the report layout.
Adding Terms and Conditions Documents in Different Languages Using Docentric in D365FO
Terms and Conditions (T&C) are documents that explain important rules for the customer. This can include things like how to pay, return items, or what happens if something goes wrong. These rules must be clear and written in the customer's language.
To use T&C with your invoices, you first need to prepare the documents. You should:
- Create a Word document for each language you need
- Include the correct legal text for each language
- Save one file per language (for example: English, German, French)

After you prepare the documents, you can upload them into Dynamics 365 Finance and Operations (D365FO) using Docentric.
Here is how to do it:
Step 1: Create a new attachment category in Docentric
- In D365FO, go to the Docentric AX workspace.
- Under the Attachment section, click on Attachment categories.
- Click New to create a new category (for example,TermsAndConditions).

Step 2: Upload the documents to D365FO for a specific legal entity
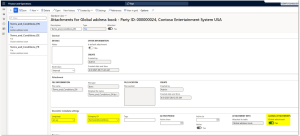
- Open D365FO and go to Legal entities. Select the legal entity you want to attach the Terms & Conditions to — in this example, it's USMF.
- Click on the Attachments icon in the top-right corner.
- In the new window that opens, click New, choose File, and upload the first document (e.g., the English version).
- Repeat the same process for the other language versions and upload them as well.

Step 3: Set Language, Category, and Global Attachment for uploaded files
Now that the files are uploaded, it's time to assign the correct settings and Docentric metadata to each one:
- Select one of the uploaded attachments (e.g., the English version).
- In the Docentric metadata settings section:
- Set the correct Language (e.g., en-US for English).
- Select the Attachment category you created earlier (e.g., TermsAndConditions).
- Enable the Global attachment checkbox.
- Repeat the same steps for the other files (e.g., German, French, etc.), assigning the correct language for each.
So now when we upload our T&C as attachment and put correct Docentric metadata settings it is time for fun and let's continue working with Electronic Reporting.

Set Up Configurations
Before we start, let’s explain a few simple terms:
- A data model is like a blueprint. It shows what kind of data your report can use.
- A model mapping is like a map. It tells the system where to find the real data that matches your data model, so it fills your data model with data.
- A format defines how the report will look, its layout, design, and structure. It puts the data into the final report output.
But in our case, we won’t use the standard ER format. We’ll use a Docentric template instead. Docentric makes it easier to design reports in Word and gives us more control. It also lets us merge extra content like Terms and Conditions, which is only possible with Docentric.
Now it is time to configure our data source in ER. To configure our data source, we do not need to start from scratch. Microsoft already provides base ER configurations for the Sales Invoice report. These will be our starting point.
Step 1: Download the Electronic Reporting Configurations
If the Sales Invoice Electronic Reporting configurations are not already available in your environment, you could get them in two ways:
- From the Global Repository directly in the Electronic Reporting workspace
- From Microsoft Dynamics Lifecycle Services (LCS) under the Shared Asset Library, where you can download Electronic Reporting configuration .xml files manually
In my development environment, I used the second option and downloaded the configurations from LCS.
You will need these three configurations. I included the versions that I used, but keep in mind these might change, as Microsoft updates them regularly:
- Invoice model (Invoice model.version.180.xml)
- Invoice model mapping (Invoice model mapping.version.180.92.xml)
- Invoice format (Sales invoice (Excel).version.180.34.xml)
I included the Excel format just for testing, to make sure everything works with the default Electronic Reporting configuration before moving on.

Step 2: Import the ER configurations from XML files
Once you have downloaded the .xml files from LCS, follow these steps to import them into D365FO:
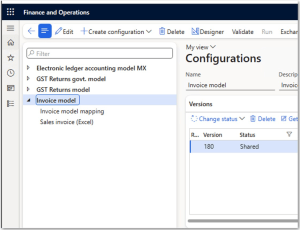
- Go to Electronic Reporting > Reporting configurations
- Click on the Exchange button and choose Load from XML file

- Import the files in this order:
- First, the Invoice model
- Second, the Invoice model mapping
- Third, the Sales Invoice Excel format


Step 3: After importing, follow these steps to test if everything works:
- Now go to Accounts receivable > Setup > Forms > Form setup, open the Print management tab and select Sales invoice.
- In the format selection, choose the Excel format you just imported.
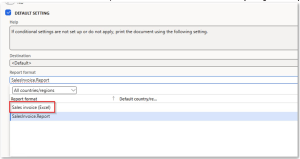
- Reprint any Sales Invoice using Use print management in the Invoice journal and it will now print in Excel


Now you are ready to move to the next step.
Step 4: Create Your Own Derived Configurations
After importing the Microsoft configurations, the next step is to create your own editable copies. These are called derived configurations.
You need to do this because Microsoft does not allow you to edit the original configurations directly. So, you must create your own versions by copying and deriving them from the ones you just imported.
You will create a derived version of the Invoice model for each of the 2 configurations:
- The Data Model
- The Model Mapping
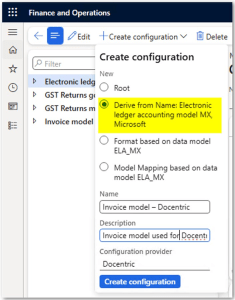
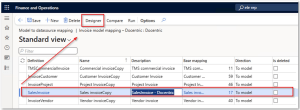
a. Create a new derived Invoice Model configuration
- Go to Electronic Reporting > Reporting configurations
- Select the Invoice model
- Click Create configuration
- In the dialog:
- Name it Invoice model – Docentric
- Choose Derive from Name: Invoice model, Microsoft
- Click Create configuration

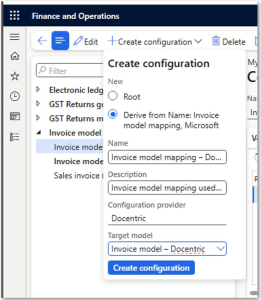
b. Create a new derived Invoice Model Mapping configuration
- In the same list, the Invoice model mapping
- Click Create configuration
- In the dialog:
- Name it Invoice model mapping – Docentric
- Choose Derive from Name: Invoice model mapping, Microsoft
- Under Target model, select your new Invoice model – Docentric
- Click Create configuration
Now that you have created your own copies of the data model, model mapping, you are free to make changes as needed. This means you can add new fields, adjust logic, or include additional files like Terms and Conditions.

These custom configurations are fully under your control, and now you are ready to move forward with customizing them.
Extend the Model Mapping to Include Terms and Conditions
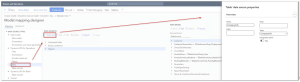
Step 1: Add Terms and Conditions Node to the Data Model
In your derived data model InvoiceModel_Docentric, you should now add a new node that will hold the Terms and Conditions document.
- Open the data model in Designer mode
- Find the »SalesInvoice« node
- Add a new child node under SalesInvoice and name it TermsAndConditions
- Set the node type to Record list
- Add a label like "Terms & Conditions" to make this node easy to identify later.
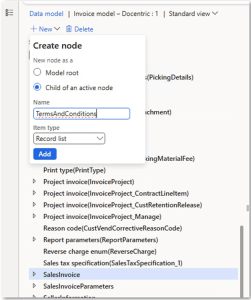
Why a record list?Because we might have more than one document stored, and this allows us to handle multiple results, even if we later filter it to one.
Use Item Reference
After creating the TermsAndConditions node in your data model, you do not need to connect individual fields manually or build them from scratch. Instead, switch Items reference of the TermsAndConditions node to an existing node that already contains all required fields, such as AdditionalDocumentReference.
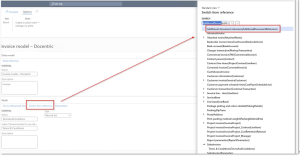


This approach allows your TermsAndConditions node to reuse the structure and fields from the referenced node. The AdditionalDocumentReference node already includes:
- Content: the container for the Terms & Conditions file
- DocumentType: the type of attached document
- FileName: the name shown in the report

By referencing this existing structure, you avoid duplicating work, ensure consistency, and keep the data model optimized for use in the Docentric template.
Step 2: Connect Terms and Conditions in the Model Mapping
In your derived model mapping InvoiceModelMapping_Docentric, you need to connect the TermsAndConditions node in your data model with actual data from the system. This is done by building the correct data sources and logic inside the Designer.
Before we begin, here’s a simple way to understand the types of data sources you’ll use:
- Table: You get access to table methods. In our case, we use it to get the current legal entity.
- Table records: This gives you many records from a table. In our case, we use it to get all document attachments related to a legal entity.
- Calculated field: This lets you write logic or formulas. In our case, we use it to filter documents and apply fallback logic like: "if the document in the right language isn’t found, use the English version".
Now let’s try to add the custom data sources:
- Open the model mapping in Designer mode
- Rename the main model mapping
In the Designer, rename the default mapping node from SalesInvoice to SalesInvoice – Docentric, then close and reopen the Designer.
- On the left, you see Data Source Types: the available types for creating data sources (tables, classes, enums, etc.)
- In the middle, under Data Sources, you can see your custom sources, such as calculated fields or table records
- On the right, you see the Data Model structure: e.g., SalesInvoice, Customer, InvoiceLines, TermsAndConditions, etc.

In the Designer:
- Add a new Table data source
- Name it: CompanyInfo
- Table: CompanyInfo
This source is needed to extract the current legal entity from the database.

- Add a new Table records data source
- Name it: DocuRefRecords
- Table: DocuRef
This table contains all attachments in the system. We will use it to find the Terms and Conditions documents.


-
Add a calculated field under CompanyInfo:
- Name: $CurrentLegalEntity
-
Right-click CompanyInfo, then Calculated field > Add, and click
Edit formula.

Use this expression:
1234@.'findDataArea()'('$SalesInvoiceHeaderFooterTmp'.dataAreaId,False)Explanation: This formula uses the findDataArea() method, which returns the
company name based on the company ID (dataAreaId) from the
$SalesInvoiceHeaderFooterTmp table.- '$SalesInvoiceHeaderFooterTmp'.dataAreaId gets the company ID for the current invoice.
- False means that if the company ID is not found, the function won’t show an error — it will just return blank.
During report execution, SSRS fills the $SalesInvoiceHeaderFooterTmp table with invoice data.
This includes the dataAreaId, which tells us which company the invoice belongs to.
The findDataArea() function then looks up this company ID in the CompanyInfo table
to get the full company name.Function used:
- findDataArea(dataAreaId, throwErrorIfNotFound)
Example output:
- If dataAreaId = 'USMF', the result is:


-
Add a calculated field at the root level:
- Name: $CurrentLegalEntityTermsAndConditionsByLanguage
-
Formula:
123456789FILTER(DocuRefRecords,AND(DocuRefRecords.dataAreaId = CompanyInfo.'$CurrentLegalEntity'.dataAreaId,DocuRefRecords.RefTableId = TABLENAME2ID("DirPartyTable"),DocuRefRecords.RefRecId = CompanyInfo.'$CurrentLegalEntity'.RecId,DocuRefRecords.LanguageId_DC = '$SalesInvoiceHeaderFooterTmp'.LanguageId,DocuRefRecords.CategoryId_DC = "TermsAndConditions"))-
Explanation:
- Is stored in the same company (dataAreaId)
- Is attached to the correct party (DirPartyTable)
- Matches the language of the invoice
- Belongs to the "TermsAndConditions" category
- FILTER(table, condition)
- Returns all rows in a table that match the given condition. - AND(condition1, condition2, ...)
- Combines multiple conditions. All must be true for a row to be included. - TABLENAME2ID("TableName")
- Converts a table name like "DirPartyTable" into its internal numeric table ID.
-
This formula filters the DocuRefRecords table to find the Terms and Conditions document for the current legal entity that:
Functions Used:
Example:

Example output:
-
If the invoice language is en-US, the result is Terms_and_Conditions_EN.docx


-
Add Fallback Logic:
- Add another calculated field at root: $CurrentLegalEntityTermsAndConditions
-
Formula:
12345678910111213141516IF(ISEMPTY('$CurrentLegalEntityTermsAndConditionsByLanguage'),FIRSTORNULL(FILTER(DocuRefRecords,AND(DocuRefRecords.dataAreaId = CompanyInfo.'$CurrentLegalEntity'.dataAreaId,DocuRefRecords.RefTableId = TABLENAME2ID("DirPartyTable"),DocuRefRecords.RefRecId = CompanyInfo.'$CurrentLegalEntity'.RecId,DocuRefRecords.LanguageId_DC = "en-US",DocuRefRecords.CategoryId_DC = " TermsAndConditions"))),FIRSTORNULL('$CurrentLegalEntityTermsAndConditionsByLanguage'))- It first checks if a language-specific version exists using:
ISEMPTY('$CurrentLegalEntityTermsAndConditionsByLanguage') - If the result is empty (nothing found), it falls back to English (en-US) using:
- FILTER(...) — finds English Terms and Conditions
- FIRSTORNULL(...) — returns the first document found (or nothing) - If the language-specific document is found, it simply uses that:
FIRSTORNULL('$CurrentLegalEntityTermsAndConditionsByLanguage') - ISEMPTY(collection)
- Checks if a table or list has zero rows. - FIRSTORNULL(collection)
- Returns the first row of a filtered collection or null if the list is empty. - FILTER(...), AND(...), and TABLENAME2ID(...)
- Work the same as explained in previous formula.
Explanation:
-
This formula is designed to guarantee that a Terms and Conditions document is always found, even if there is no version of document in the invoice’s language.
Functions Used:
- It first checks if a language-specific version exists using:
Bind the Data Model to the Data Source
Now that the calculated fields are ready, we need to connect our data model to them. This is called binding.
Bind the TermsAndConditions node to the calculated field $CurrentLegalEntityTermsAndConditions, which returns the correct document for the report.

Bind Child Fields:
Each child field inside the TermsAndConditions node also needs to be connected to real data. This is how you tell the system what content to show and how.
- Content
- This field holds the actual file content (the Word document).
- Use this method to bind it:
1getFileContentAsContainer(): Container - This method is part of the table and returns the binary content of a file stored in a document attachment. In this case, it fetches the content of the Word file that Docentric will embed into your report layout. It must be used for embedding file content in templates.

- DocumentType
- Use this binding:
1$CurrentLegalEntityTermsAndConditions.Name - This expression gets the name of the document type for the file attached to the legal entity. It our case is "TermsAndConditions" or whatever document type you have defined.

- FileName
- Use this expression:
1'$CurrentLegalEntityTermsAndConditions'.'filename()' - This ER expression calls the filename() method on the attachment record, which returns the actual file name of the Word document.

These bindings make sure the document will show up in the report with the correct name and content.
Next, you’re ready to move on to designing the layout in Docentric and placing the Terms and Conditions document into the invoice output.
Design the Layout in Docentric
We already said that merging Word documents is only possible with Docentric. Now we will use it to add Terms and Conditions to the Sales Invoice report, and that is what we will do now.
Now that your data model includes the correct Terms and Conditions file, based on language and fallback logic, it is time to show this content in the report layout using a Docentric template.
Step 1: First, make sure the CBD data sources is enabled in Docentric:
- Go to Docentric parameters
- Under the Product tab, make sure the checkbox Enable CBD data sources is set to Yes

Step 2: Set the ER Configuration as the Data Source for the Docentric Design of the Sales Invoice
- In D365FO, go to the workspace and open the Docentric AX workspace.
- Click Reports, which opens the Docentric AX reports form.
- Find the SalesInvoice.Report and open it to see the report setup. If it is not listed, click Add at the top to add it.
- In Docentric AX reports form we need to connect the SalesInvoice.Report to the ER data model that we configured, so click the Configurable business documents button to open the form for selecting the data model and model mapping:
-
- Under the CBD data source fast tab, select Invoice Model – Docentric in the ER Data Model field.
- Select Sales Invoice Mapping – Docentric in the ER Model Mapping field.

Step 3: Download and open the template in Docentric AX Designer
- Go back and go to the Templates fast tab to check if you already have a template available that uses the ER data source and it needs to be set as the default one. If the template is based on SSRS, it will not work for this scenario.
- If no template is available, you can download it from the Docentric website or install the correct replica (CBD model). This should allow you to fetch the template from the AOT resource.
- Select the template and click the Download button. Then open it in Docentric AX Designer (Microsoft Word with the Docentric Add-in).
- Now go back and under the Data source menu group, click Generation options.
- Enable the checkbox Generate DDSP when report runs. This ensures a new DDSP file will be generated every time you run the report. This DDSP file gives you the latest data structure, labels translations and report data which you will load into the template.
- Go to Print management for the document Sales Invoice, set the Print destination to Docentric Screen (important: you must use a Docentric print destination), and set the Format to SalesInvoice.Report so that Docentric takes over the rendering.


This is actually the SSRS report format. But when this report is started, the settings in Docentric AX reports instruct reporting engine to use Docentric template which uses ER data source.
- Go to the Invoice journal in D365FO and select any posted invoice.
-
- Click Use print management to print the invoice.
- This will run the report and automatically download a new .ddsp file in your browser.
- This file contains the updated data structure which you can now load into your template for binding fields.

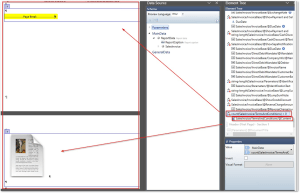
Step 4: Load New Data into the Template
- Now that you have the latest DDSP file, it’s time to load it into the template which we already open before.
- In the Docentric tab, click Load Data Source (.ddsp)
- Select the DDSP file you downloaded earlier
- Once loaded, you should now see the TermsAndConditions node in the data source pane on the right side. This confirms that the Terms and Conditions data is ready for use in the template.

Step 5: Modify the Template to Include Terms and Conditions
- In Word, place your cursor where you want to insert the Terms and Conditions content (for example, after the invoice lines or on a new page)
-
In the Docentric tab, insert a new If tagging element
- This makes sure the content only appears if the Terms and Conditions exist
- Use this XPath expression:
count(SalesInvoice/TermsAndConditions) > 0

- Inside the If tagging element, insert a page break so the Terms and Conditions start on a new page
-
Still inside the same tagging element, insert a SubDocument tagging element
- Bind it to the Content field of the TermsAndConditions node
- This field holds the actual Word file content, and Docentric will merge it into the layout automatically
- Save the updated template

Now the data from your ER model mapping is available inside the template.
Step 6: Attach the Updated Template
- Go back to the Docentric workspace in D365FO. Navigate to Reports and select SalesInvoice.Report.
-
Under the selected SalesInvoice.Report, find the template fast tab and click Attach to upload the updated template file you just modified.
- In this example, we're attaching it to the existing report template with ID CBDSalesInvoice.Report.
- If needed, you can create a new template ID instead.
- We are using Blob storage in our setup, but feel free to use any other storage type that fits your configuration.

- Set this template as default (if not), so it will be used automatically when printing both the original and the copy of the invoice.

Step 7: Test a template
Reprint a Sales Invoice to test your changes and confirm that the correct Terms & Conditions document is now included.

Step 8: Final Test and Verification
- Reprint Sales Invoices for customers in different languages (e.g., German, French).
- Check that the correct version of the Terms & Conditions appears at the end of the invoice.
- Verify that if a language-specific version is missing, the English fallback version is used.
Wrapping Up
You did it! You successfully added Terms and Conditions to your Sales Invoices in different languages, without writing any code.
With Electronic Reporting and Docentric, you created a smart setup that picks the right Terms and Conditions document based on the customer’s language. If there’s no file in that language, the system will use the English version instead.
This setup helps you follow legal rules, make customers happy, and save time. If you ever need to update the Terms and Conditions document, just upload a new file, it will be added to all new invoices automatically.