
 Tags: D365FO, Electronic reporting, Full Edition, Invoice, Template design
An industrial tools supplier got feedback from customers that their invoices were too plain. The documents looked basic and didn’t include helpful product details. Customers wanted more than just a price list. They wanted to see the products they ordered and get a short info sheet with each invoice.
At that time, the company was using the standard Sales Invoice report in Dynamics 365 Finance. This layout couldn’t show product images, attach documents, or match the company’s branding. The invoice worked for accounting but didn’t give customers a good experience.
To fix this, the company redesigned the invoice. They added product images to the invoice and attached product datasheets automatically. The layout looked cleaner and matched the company’s style. They built the whole solution without writing any code.
The Solution
The solution involved:
- Electronic Reporting (ER) framework to bring product images and documents into the report data
- Docentric AX framework and Docentric AX Designer to design the invoice layout in Microsoft Word using the data from ER model
Who This Guide Is For
This guide is aimed at consultants and functional users who are familiar with working in the Dynamics 365 Finance and Operations environment and feel comfortable using Microsoft Word.
What You Will Learn
In this step-by-step guide, we’ll show a real-world example:
A Sales Invoice that includes product images and attaches product specification documents.
Here’s the process we’ll follow:
- Attach product images and specifications to released products
- Extend the ER data model to include product images and specifications
- Add images to the ER format
- Design the invoice layout in Microsoft Word using Docentric AX Designer, including product images and embedded product specifications
Add Product Images and Specifications in D365FO
Product images and product specification documents help customers understand your product better. A product image gives a quick visual, while a specification file provides the details.
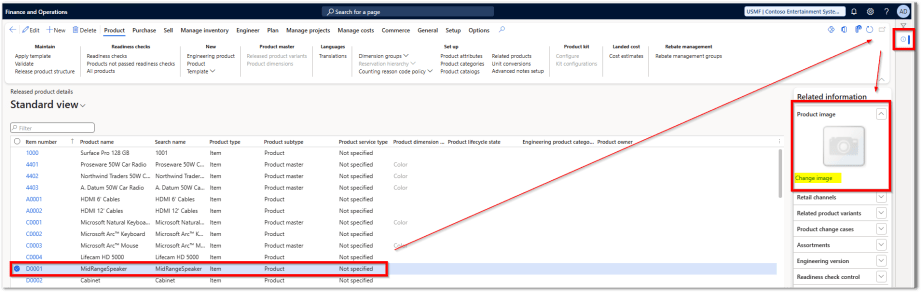
To include these in your Sales Invoice, you need to attach the files to the product first. For images, you can use the Product images fast tab in the Released products form. For product specifications, upload them as File-type attachments.
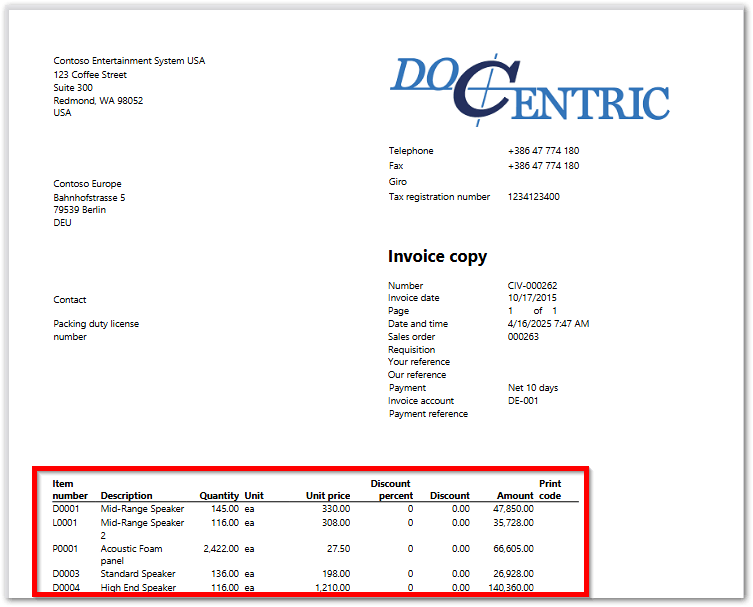
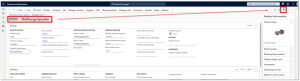
For testing, I selected an existing invoice (CIV-000262) and will reprint it after adding all the required images and product specifications in my DEV environment for legal entity USMF. The invoice includes the following products:
- D0001: Mid-Range Speaker
- L0001: Mid-Range Speaker 2
- P0001: Acoustic Foam
- D0003: Standard Speaker
- D0004: High End Speaker
For each of these items, I prepared a product image and a technical specification document (Word format).
![]()
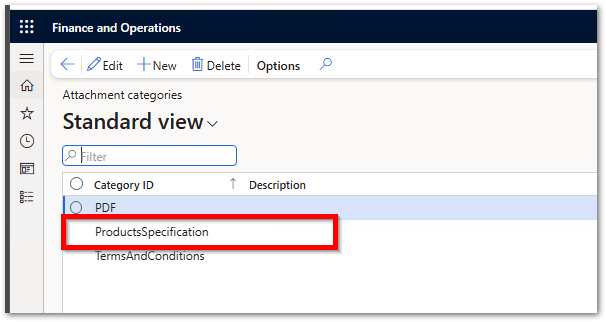
Step 1: Create a new attachment category in Docentric
- In D365FO, go to the Docentric AX workspace
- Under the Attachment section, click on Attachment categories
- Click New to create a new category (for example: ProductsSpecification)
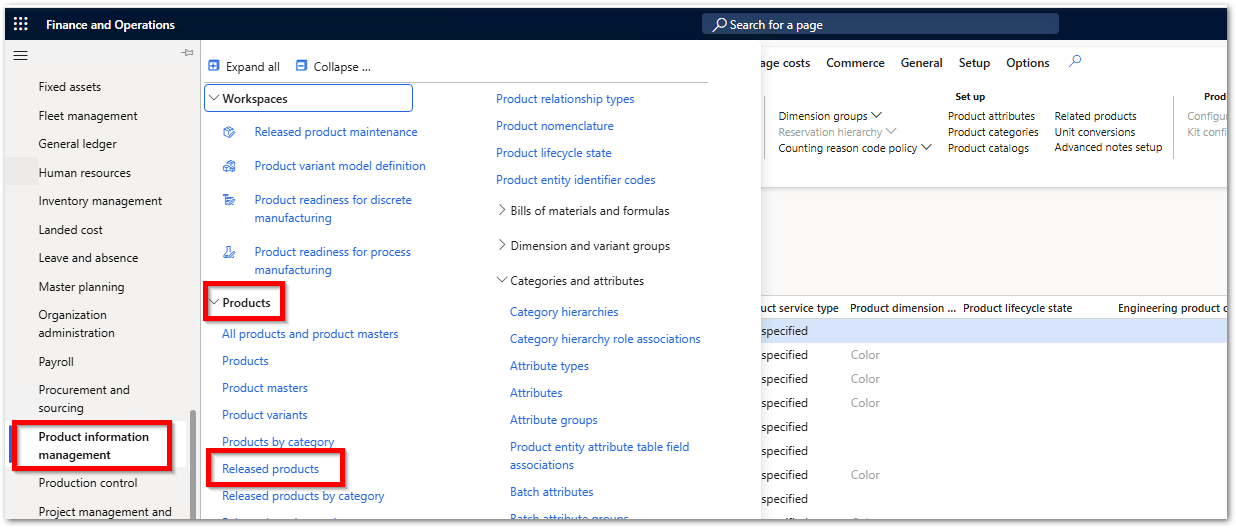
Step 2: Go to Released Products
Navigate to:
Product information management > Products > Released products
Step 3: Upload Product Image
Select the product you need to update. Click on Related information, then under the Images tab, click Change image and upload the image. Repeat this for each product.
Step 4: Upload product specification as attachments
-
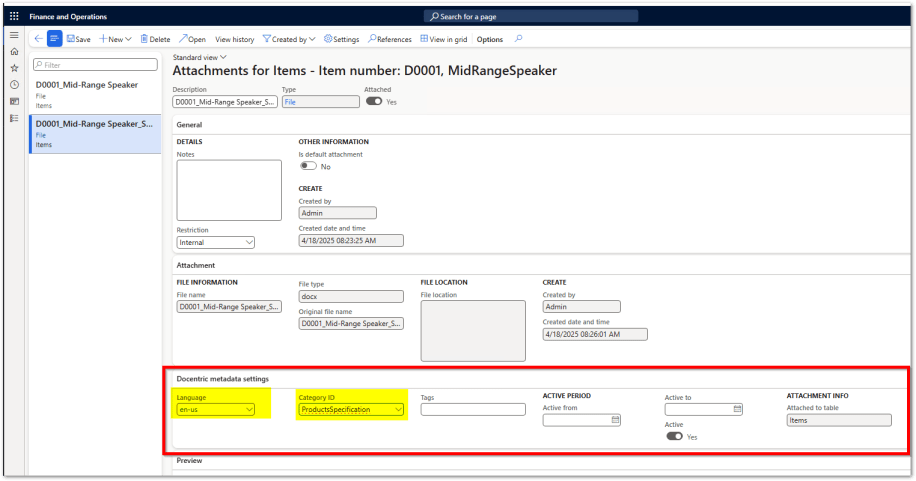
Go to the product details and click Attachments in the top-right corner
- Click New and choose File as the type
- Upload the product specification file for that product
- In the Docentric metadata, set Language to en-US and set Category to the value we created (ProductsSpecification).


Be careful with large images or big files.
Avoid uploading very large images or documents because they become part of the report’s data source. If they’re too big, your report can take up a lot of space and may exceed email size limits when sending invoices by email. This can cause failures or delays.
To prevent issues, optimize images before uploading: resize them to reasonable dimensions (e.g. max 800x800 px), compress them if needed, and save them in web-friendly formats like JPG or PNG.
This way, you keep the file size small but still get a clear and useful output on the invoice.
Now Your Products are Ready
Each product now has a clear image and a product specification file attached. These files are linked to the product and can be used in your Sales Invoice report layout.
Set Up ER Configurations
Before we extend the data model, let's make sure we have the right ER configurations in place. These configurations will act as the base for customizing our Sales Invoice report.
First, here’s a quick refresher:
- A data model defines what data is available in the report.
- A model mapping connects this model to actual data in the system.
- A format defines how the data is displayed in the final document.
We’ll use a Docentric template later to get the most flexibility. But to begin, we’ll use Microsoft’s default ER format just to test if our product images show up correctly. While the Excel layout won’t allow merging full product specification documents, we can still test if the thumbnails display correctly.
Step 1: Download the ER Configurations
If the Sales Invoice ER configurations are not yet in your environment, download them using one of these methods:
- From the Global Repository in the Electronic Reporting workspace
- From Lifecycle Services (LCS) > Shared Asset Library (manual download)
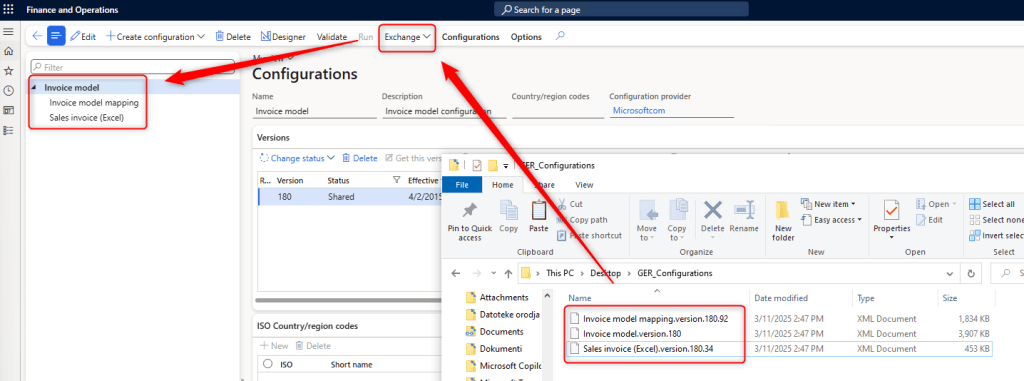
In this example, I used the second method and downloaded the XML files from LCS.
I have used these files for my case:
- ER Model: Invoice model.version.180.xml
- ER model mapping: Invoice model mapping.version.180.92.xml
- ER Format: Sales invoice (Excel).version.180.34.xml
Step 2: Import the Configurations
- Go to Electronic Reporting > Reporting configurations
- Click Exchange > Load from XML file
-
Import them in this order
- First: Invoice model
- Second: Invoice model mapping
- Third: Sales Invoice ER format (Excel-based)
Step 3: Test the Configuration
- Navigate to Accounts receivable > Setup > Forms > Form setup
- Open the Print management tab and choose Sales invoice
- In the Report format selection, pick the Excel layout
- Reprint any posted invoice by selecting 'Use print management' from the Invoice journal.

Once you see the output in Excel, you’re ready to start extending the ER data model.
Create Editable Copies of ER Configurations
Before we can customize the ER data model, model mapping, or format, we need to create our own editable copies. Microsoft-provided ER configurations are locked by default, so we must derive our editable versions from them. We first need to create a new configuration provider and set it active, if we don’t have it yet.
Step 1: Create a Derived Data Model
- Go to Electronic Reporting > Reporting configurations
- Select the line for Invoice model
- Click Create configuration
-
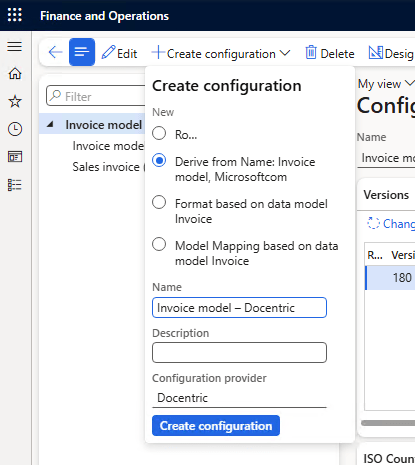
In the popup:
- Set the name to: Invoice model – Docentric
- Under Derive from, choose: Invoice model, Microsoft
- Click Create configuration
- Enable the Run draft flag and set it to Yes. (If you don’t see the Run draft checkbox, select Configuration > User parameters and set Run settings to Yes.)
Step 2: Create a Derived Model Mapping
- In the same list, select Invoice model mapping
- Click Create configuration
-
In the popup:
- Set the name to: Invoice model mapping – Docentric
- Under Derive from, choose: Invoice model mapping, Microsoft
- Under Target model, select the new model: Invoice model – Docentric
- Click Create configuration
- Enable the Run draft flag and set it to Yes.

Now you have editable versions of the data model and model mapping, and you're ready to extend them with additional fields, such as product images and specification documents.
Modify the ER Data Model
Now that you've set up your base configurations and created derived versions, it's time to modify the ER data model.
Step 1: Open the ER Data Model
First, we will open the data model and add new child nodes under the invoice line. For each field, we will also set a label and choose the correct data type:
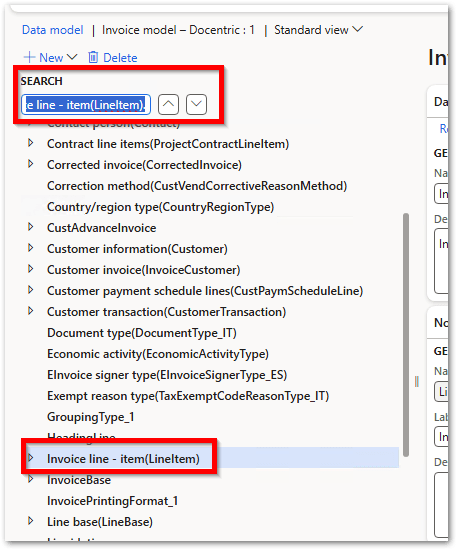
Open Electronic Reporting > Reporting configurations, select your derived Invoice model, and click Designer.
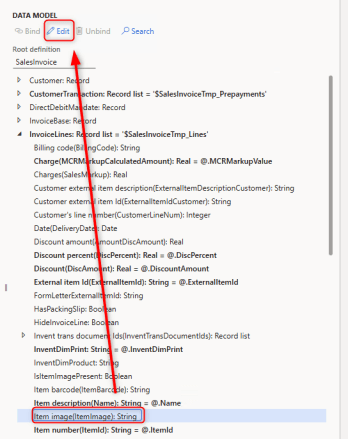
In the Designer, on the left-hand side where the model structure is shown, find the node called: Invoice line - item(LineItem)
Step 2: Add Fields for Product Image
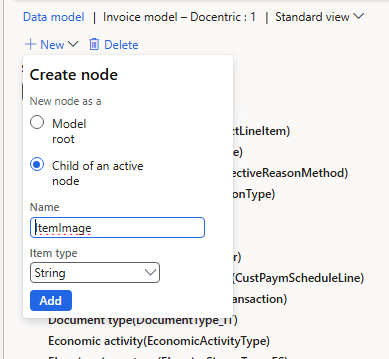
Now add the following child nodes. All of them go under Invoice line - item(LineItem) node:
-
ItemImage: type String, label "Item image"
This will hold the name or path of the product image (for reference only).
-
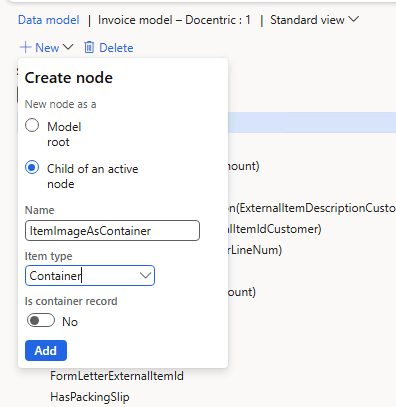
ItemImageAsContainer: type Container, label "Item image as Container"
This will store the actual image content and will be used to show the image in the report.
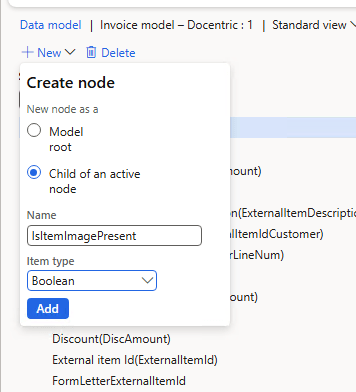
-
IsItemImagePresent: type Boolean, label "Is item image present"
This helps check if the image exists and lets us decide whether to show or hide it in the Excel-based ER format.
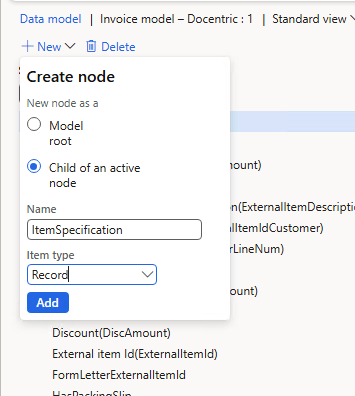
Step 3: Add Product Specification Record
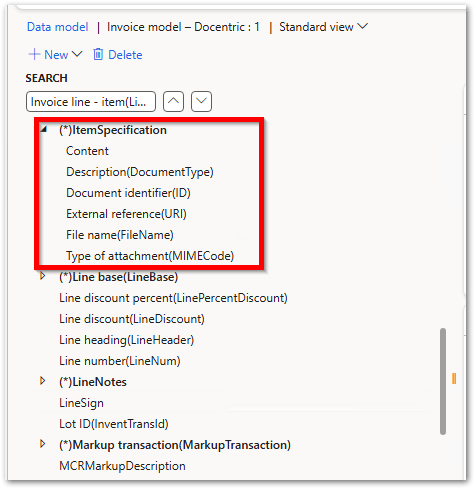
Next, we will add one more node called ItemSpecification as type Record, label "Item Specification".
This will hold the product specification data.
Step 4: Review Inherited Fields
Since ItemSpecification needs detailed data and a similar structure already exists, we’ll just reference AdditionalDocumentReference instead of creating everything from scratch.
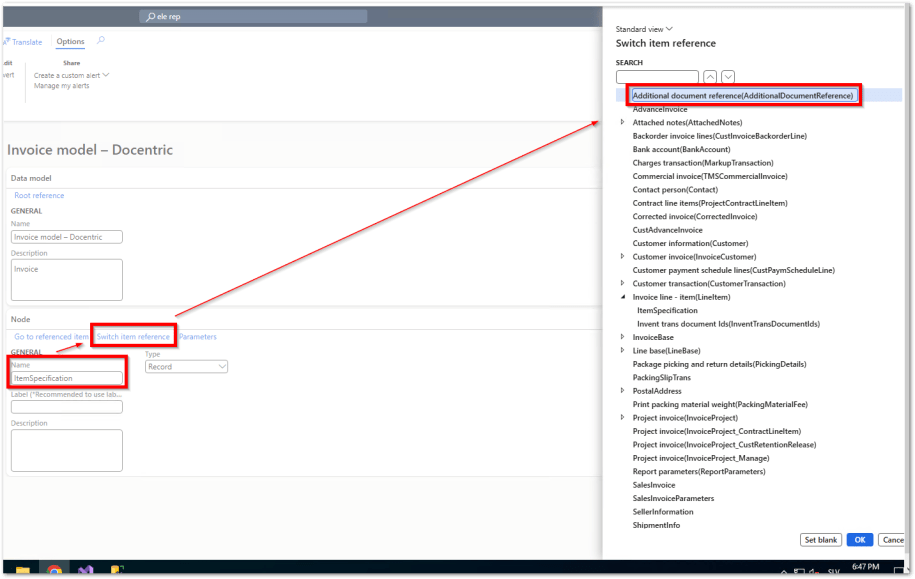
Inside the ItemSpecification node, you’ll see fields inherited from AdditionalDocumentReference, such as:
- FileName (type String): the name of the attached product specification
- FileContent (type Container): the actual file content
- FileLanguage (type String): the document language
- IsFileAvailable (type Boolean): true or false, tells if the file is available
Once you have added all fields, click Save.
Now these fields are part of your ER data model. In the next step, we will connect them to real data using ER Model Mapping.
Modify the ER Model Mapping
Now we’ll bind the new fields in the ER data model to actual data from the system using model mapping.
Step 1: Open the ER Model Mapping
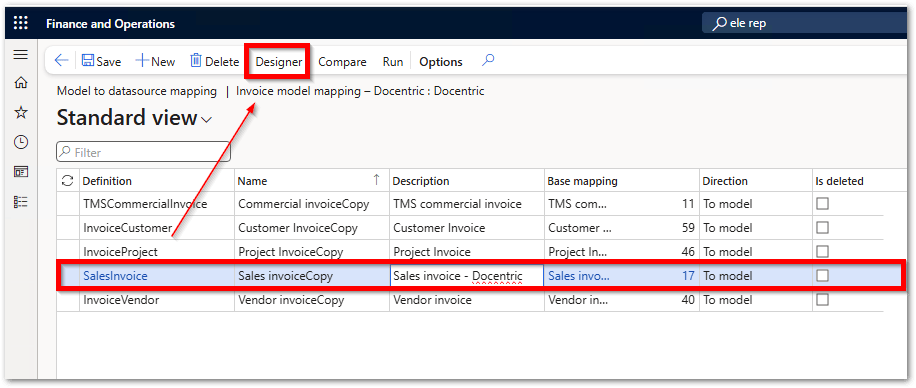
- Go to Electronic Reporting > Reporting configurations
- Select your derived ER Invoice model mapping (Invoice model mapping – Docentric)
- Click Designer
- Find the SalesInvoice mapping (I renamed the description to SalesInvoice - Docentric) and click Designer again.
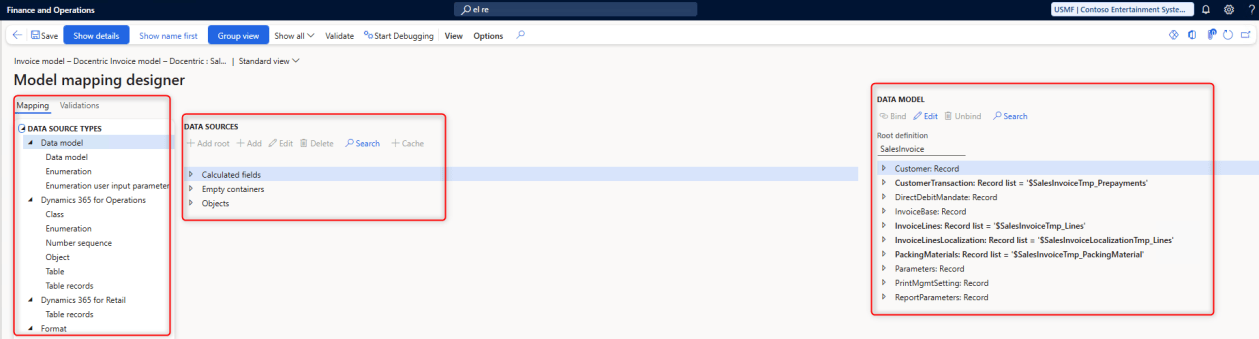
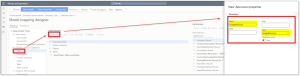
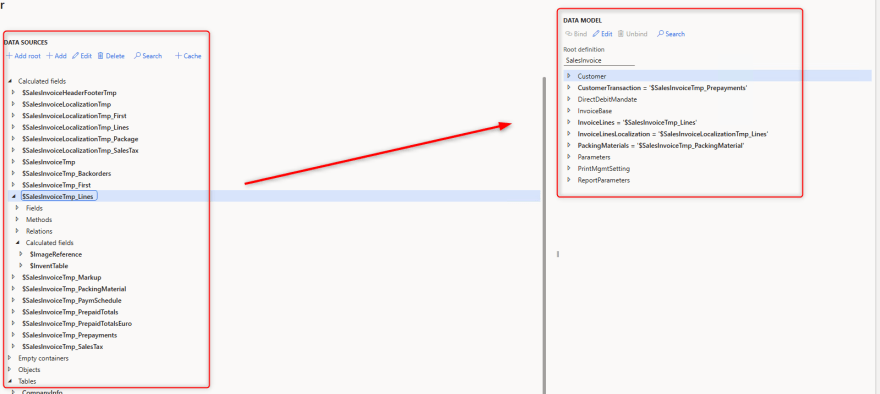
In the Model Mapping Designer:
- On the left, you will see the available data source types
- In the middle, you will see the data sources (standard and custom ones)
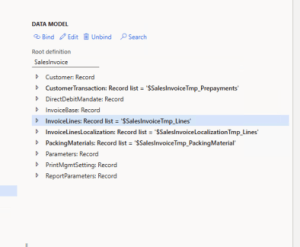
- On the right, you will see the structure of your ER data model
Step 2: Add Custom Data Sources
To fetch the product image and the product specification document, add these data sources as your custom data sources:
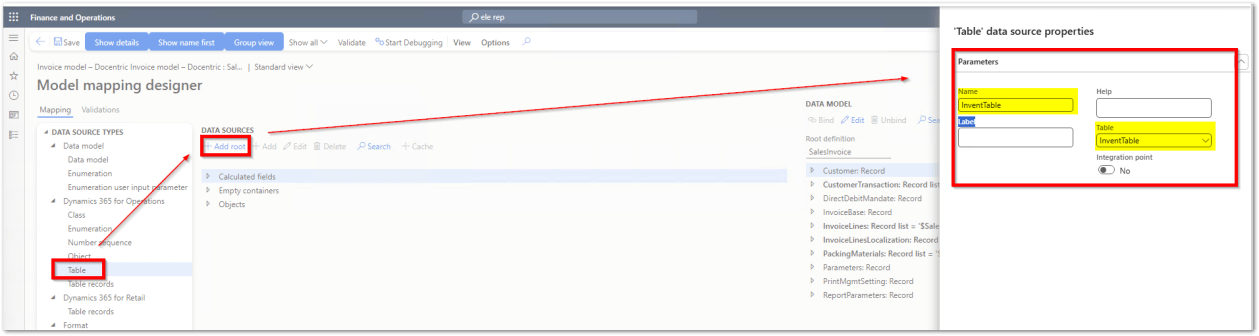
-
Add a new custom data source with type Table.
Set the Name to InventTable and select the InventTable table.
This table contains product-level data and will be used to find the product for each invoice line.
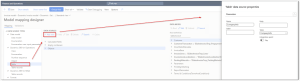
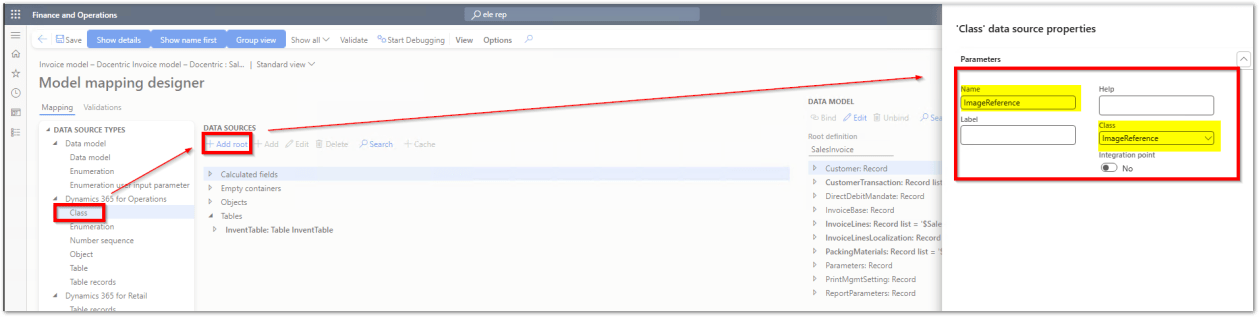
-
Add a new custom data source with type Class.
Set the Name to ImageReference and select the ImageReference class.
This class helps fetch the thumbnail image for the released product.
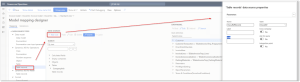
-
Add a new custom data source type Table
- Name it: CompanyInfo
- Table: CompanyInfo
This source is needed to extract the current legal entity from the database.
-
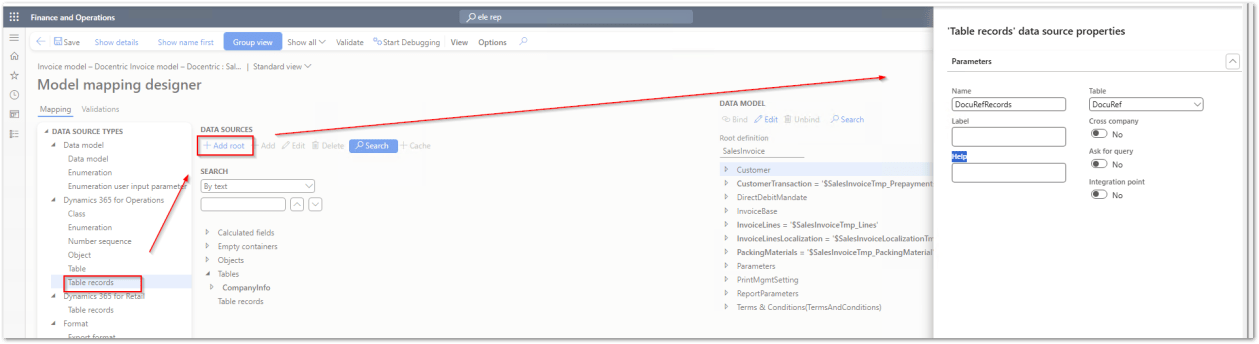
Add a new custom data source type Table records
- Name it: DocuRefRecords
- Table: DocuRef
This table contains all attachments in the system. We will use it to find the Product specification documents.

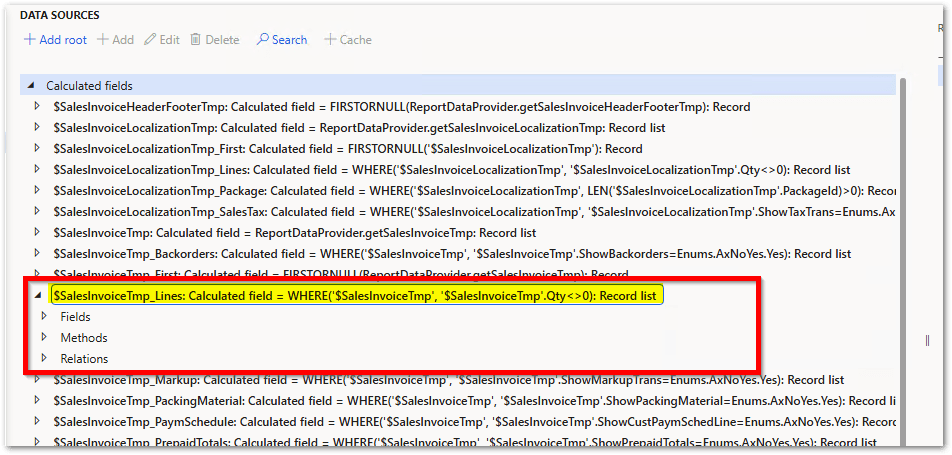
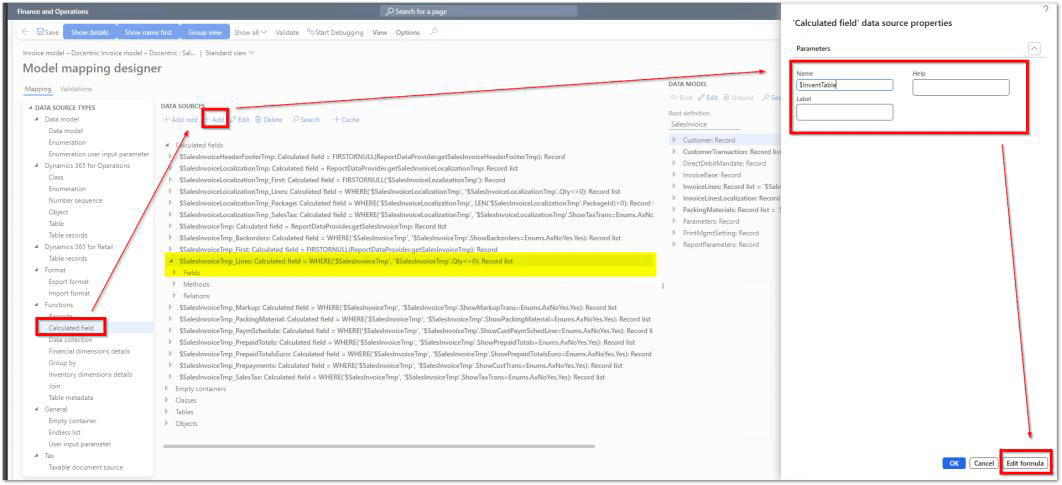
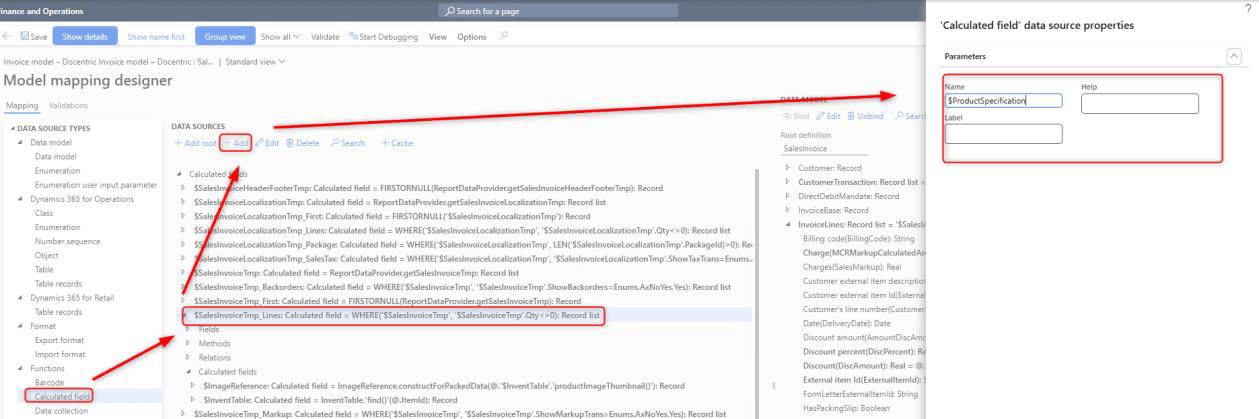
Step 3: Create Calculated Fields
Now we’ll add calculated fields under the SalesInvoiceTmp_Lines data source to fetch and prepare the product image and document data. To do this, select SalesInvoiceTmp_Lines, choose Calculated field as the data source type, and then click the Add button.
-
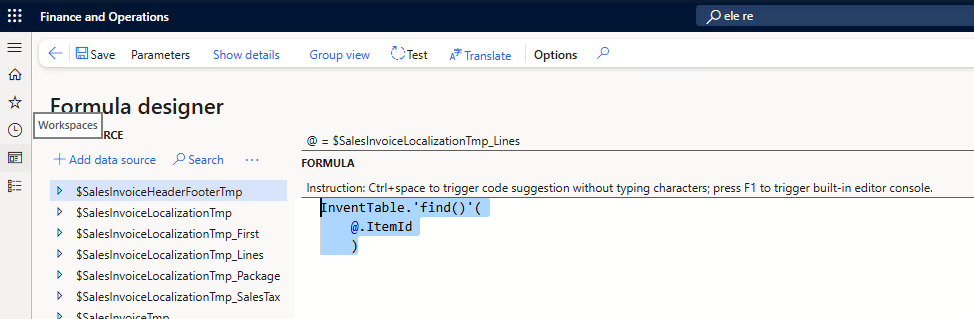
Create a calculated field named $InventTable and click Edit Formula:

Use the formula:
123InventTable.'find()'(@.ItemId)
Explanation: This formula finds the matching product record from the InventTable based on the ItemId of the current invoice line.
-
Create another calculated field in same way named $ImageReference under SalesInvoiceTmp_Lines.
Use the formula:
123ImageReference.constructForPackedData(@.'$InventTable'.'productImageThumbnail()')
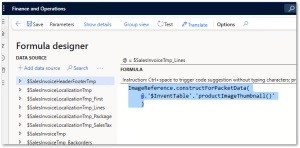
Explanation: We use the ImageReference class to build the image object for the released product. Since the product image is stored as a thumbnail, we need to read that thumbnail and create an image reference from the packed data. This lets us display the image in the invoice later.Functions Used:
- productImageThumbnail() — retrieves the thumbnail image of the product.
- constructForPackedData() — builds an image reference from the image data.
- find() — searches the InventTable by ItemId.

Bind a custom data source with your data model
Now that we’ve prepared the custom data source in the middle section of the designer, we need to bind it to our data model on the right side of the designer.
Step 1: Bind the ItemImage Field with a Condition
-
In your data model – right side, go to the InvoiceLines: Record list = '$SalesInvoiceTmp_Lines' node.
- Find the ItemImage
-
Select it and click Edit:

-
Then enter the following expression:
12345IF(@.'$ImageReference'.parmImageType ="Base64",@.'$ImageReference'.parmImageData,"")
Explanation: This checks if the image is available in Base64 format. If yes, it returns the image data. If not, it returns an empty string. This way, we pass the image only if it exists.

Next, we’ll bind the image as a container so we can use it in Excel-based report layout for ER model format.
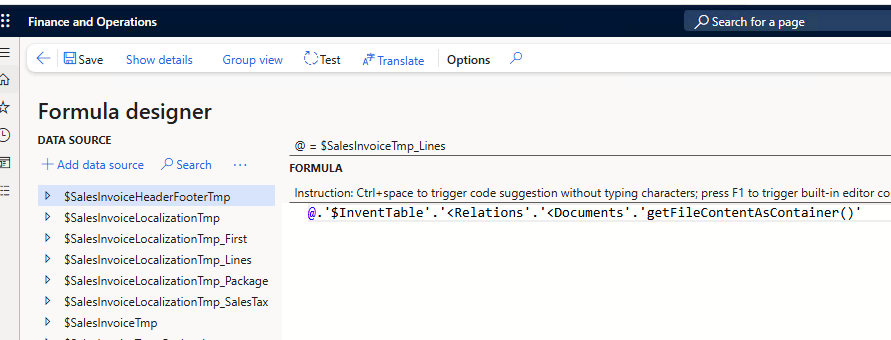
Step 2: Bind the Image as a Container
- Still under InvoiceLines, find the ItemImageAsContainer field
-
Select it and click Edit, then enter this expression:
1@.'$InventTable'.'<Relations'.'<Documents'.'getFileContentAsContainer()'

Explanation:
What we are doing here is fetching the original product image from the InventTable — the same image we uploaded earlier as a product document. We use the method getFileContentAsContainer() on the attachment to get the actual file content. This will allow us to display the full image in our Excel layout.
Step 3: Bind the IsItemImagePresent Field
Next, we also included a Boolean field in our model called IsItemImagePresent. Since Excel doesn’t support conditional formatting out of the box like Word templates, we need to pass extra information into the data model so we can control the visibility of the image in the layout.
- Select the IsItemImagePresent field in the data model
-
Click Edit.
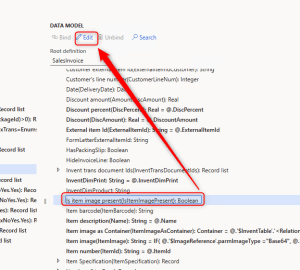
-
Use this expression:
12345IF(ISEMPTY(@.'$InventTable'.'<Relations'.'<Documents'),FALSE,TRUE)
Explanation:
This formula checks if the Documents collection in InventTable is empty. If it is, it returns FALSE; otherwise, it returns TRUE. This result can be used in the Excel layout to decide whether to show the image or not.

Functions Used:
-
IF() — checks a condition and returns one value if true, another if false.
Used to return image data only when it's Base64, and to set the Boolean flag for image visibility. -
ISEMPTY() — returns TRUE if the given collection is empty, otherwise FALSE.
Used to check if the Documents collection contains any attachments. -
getFileContentAsContainer() — retrieves the content of a document or attachment as a container (binary format).
Used to fetch the actual image file content for use in the Excel layout.
Once you save this, you’re done with the product image part. Let’s continue with the product specification document.
Bind Product Specification Document
Now we’ll work with the product specification document, and we need to add some additional custom data sources to support this. Let’s go back to the custom data source and continue with the next steps.
Step 1: Add a calculated field under CompanyInfo
- Name: $CurrentLegalEntity
-
Right-click CompanyInfo, then Calculated field > Add, and click Edit formula
-
Use this expression:
1234@.'findDataArea()'('$SalesInvoiceHeaderFooterTmp'.dataAreaId,False)
Explanation:
This formula uses the findDataArea() method, which returns the company name based on the company ID (dataAreaId) from the $SalesInvoiceHeaderFooterTmp table.

Step 2: Add a calculated field for product specification in SalesInvoiceTmp_Lines
-
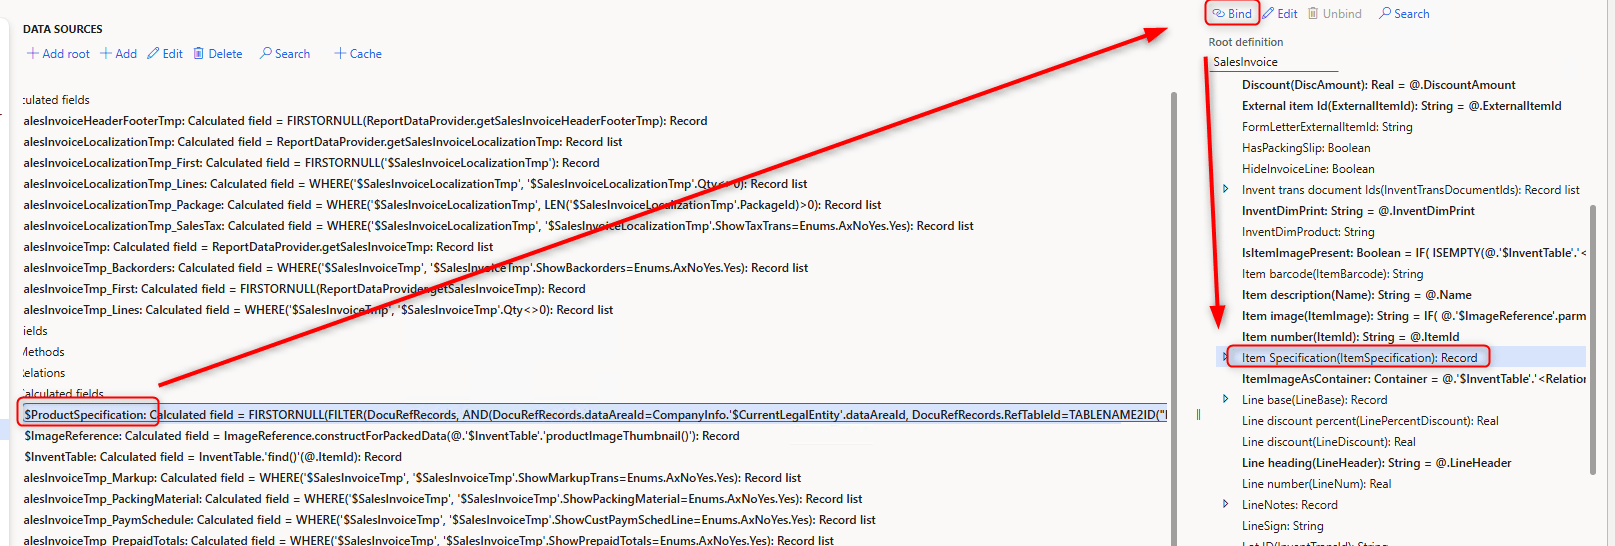
In SalesInvoiceTmp_Lines, add a calculated field named $ProductSpecification.
-
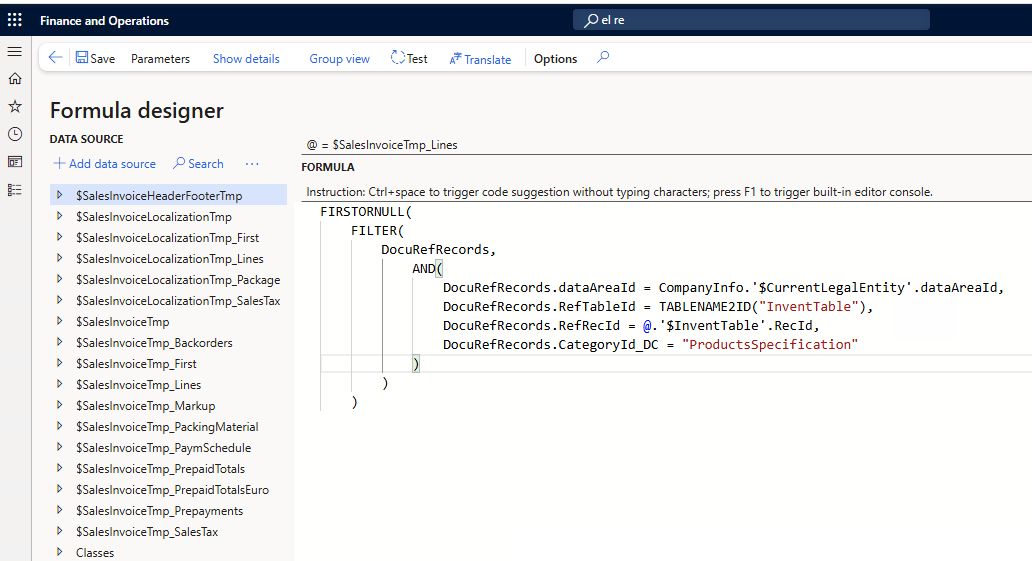
Click on Edit formula and use this formula:
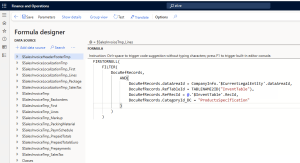
-
Use this expression:
1234567891011FIRSTORNULL(FILTER(DocuRefRecords,AND(DocuRefRecords.dataAreaId = CompanyInfo.'$CurrentLegalEntity'.dataAreaId,DocuRefRecords.RefTableId = TABLENAME2ID("InventTable"),DocuRefRecords.RefRecId = @.'$InventTable'.RecId,DocuRefRecords.CategoryId_DC = "ProductsSpecification")))
Explanation:
This formula looks for the first product specification attachment linked to the product on the invoice line. It filters by legal entity, product record, and category.
Step 3: Bind the Field for Product Specifications
Now comes the easy part: binding the data model to our custom data source.
First, bind the ItemSpecification record node in the data model (right)to the $ProductSpecification calculated field (middle).
Step 4: Bind Child Nodes within ItemSpecification
Once the parent node is bound, we need to bind each of its child nodes to specific properties or methods from $ProductSpecification our custom data souce.
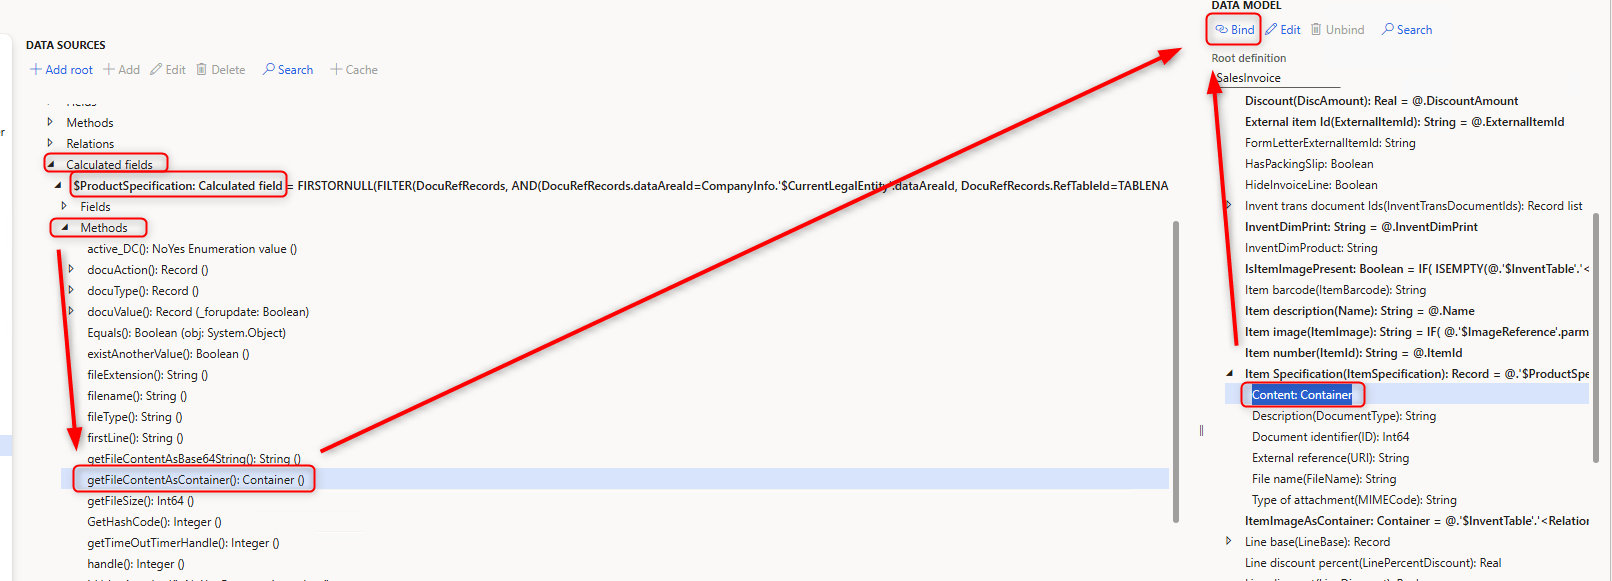
Bind the File Content to the Data Model
To include the actual product specification file in the report, we need to pass its binary content to the data model.
- In the middle of the designer: In the $ProductSpecification calculated field, locate the method:
getFileContentAsContainer(): Container - On the right of the designer: Bind this method to the Content field (type: Container) in your data model under the ItemSpecification node.
This will make the file available for display in the final document using Docentric, or for embedding as an attachment when printing or emailing the report.
Functions Used:
- findDataArea(dataAreaId, throwErrorIfNotFound) — returns the company record from the CompanyInfo table based on the provided company ID.
Used to identify the current legal entity for filtering attachments. - FILTER(source, condition) — filters records from a data source using the specified condition.
Used to find matching attachment records based on legal entity, table ID, record ID, and category. - FIRSTORNULL(collection) — returns the first record from a filtered collection, or null if the collection is empty.
Used to get a single matching product specification document per invoice line. - TABLENAME2ID("InventTable") — converts the string "InventTable" into its internal table ID.
Used to compare against the RefTableId field in DocuRef. - getFileContentAsContainer() — retrieves the binary content of the attached document (PDF, Word, etc.).
Used to bind the file content to the Content node in the data model for display or embedding.
Bind the Remaining Fields
These fields provide descriptive and technical metadata about the product specification document. This information can be shown on the invoice, used for conditional formatting, or passed to the layout for file identification.
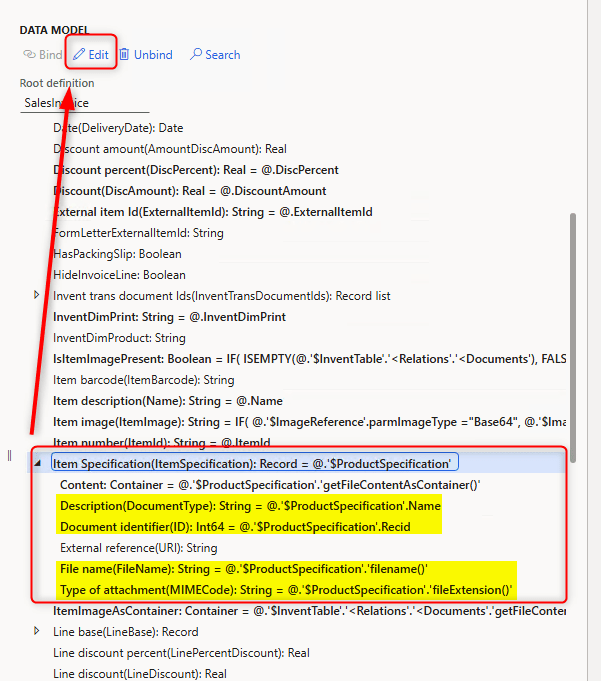
-
Description (DocumentType): String
This field is used to provide a short description of the document. For example, you might display the label “Specification Sheet” on the report.
Expression:
1@.'$ProductSpecification'.Name -
File name (FileName): String
This field returns the name of the attached file, such as foam-spec.pdf or speaker-details.docx. It can be displayed on the report or used as part of a hyperlink or label.
Expression:
1@.'$ProductSpecification'.'filename()' -
Document identifier (ID): Int64
This is the internal ID (RecId) of the attached document in the system. It’s usually used behind the scenes for reference or tracking, but it can also be displayed or used in logic.
Expression:
1@.'$ProductSpecification'.RecId -
Type of attachment (MIMECode): String
This field tells you the MIME type of the file, such as application/pdf or application/vnd.openxmlformats-officedocument.wordprocessingml.document. It helps identify the type of content, which is especially useful if you need to control how different file types are displayed or attached.
Expression:
1@.'$ProductSpecification'.'fileExtension()'
Functions Used
- filename() — returns the name of the attached document (e.g. "foam-spec.pdf")
- fileExtension() — returns the MIME type string of the document (e.g. "application/pdf")
Once all nodes are properly bound, your ER mapping model is ready to deliver product specification documents in the invoice output. This setup ensures that each invoice line can carry its own product-specific documentation automatically.
Extend the Sales Invoice Format Using Business Document Management
Now that we’ve extended the data model and mapped the necessary fields, we’ll also extend the ER format to show how this can be done. The final design will be done in the Docentric Designer, since Electronic Reporting does not support document merging.
Instead of editing the format directly in the Electronic Reporting (ER) designer, we’ll use the Business Document Management (BDM) tool to make the changes more easily.
BDM is a tool built on top of the ER framework. It is designed to help users modify business document templates, such as invoices, directly in Microsoft Word or Excel, without needing developer tools.
In our case, we’ll modify the Sales Invoice template to include product images.
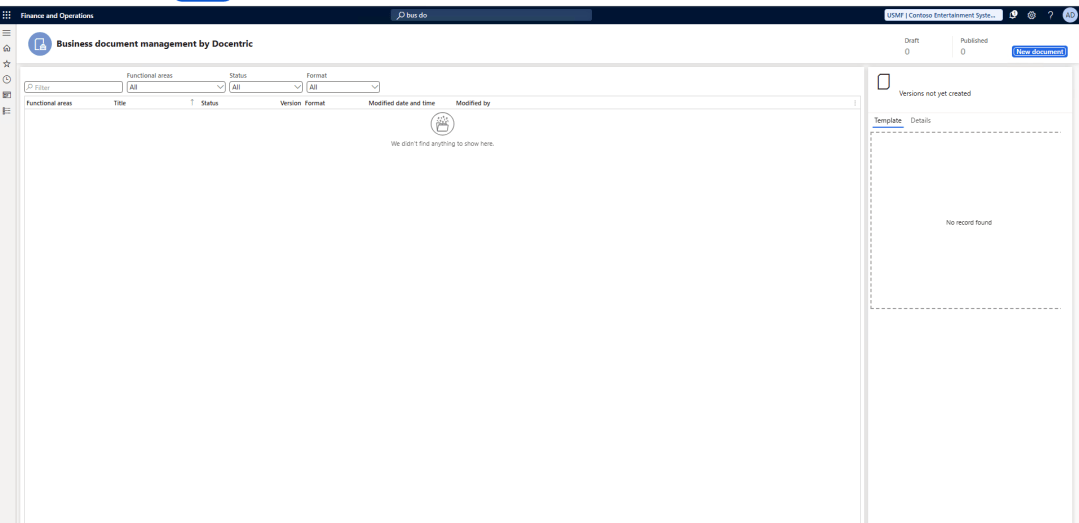
Step 1: Add a New Document Template
- Go to Business Document Management by typing it into the search bar.
- Click New document in the top-right corner.
- Select the ER format you want to modify (for example, Sales Invoice Excel), then click Create document in the bottom-right corner.
- In the new window, enter a name—for example: Sales Invoice Excel with Product Images.
- Click OK. Excel will open with the new template ready for editing.
Note for DevBox and On-Prem Environments
If you're working on a development machine or in an on-prem-style environment, the template might not open in the browser.
This is because such environments don’t support the trusted tokens needed for online Office integration.
If you get an error like "Workbook cannot be opened", choose the option to open it in the desktop app instead.
Before We Start: Understanding Cells, Ranges, and Named Ranges in Excel
Before we start editing the Excel layout for Electronic Reporting (ER), let’s quickly explain some basic Excel concepts that are important when working with ER.
In Excel, a cell is a single box where you can type data. Each cell has an address, like A1, which means column A and row 1. When you select a group of cells, that’s called a range. For example, A1:A5 means all the cells from A1 down to A5. Excel also has something called the Name Manager, which lets you give a name to a cell or range of cells. For example, instead of always writing A1:A5 in your formulas, you can give it a name like “SalesData” and use that name instead.
Why is this important in Electronic Reporting? When we create or edit Excel templates for ER, we often need to place data in specific locations in the Excel file. Instead of hardcoding cell positions, we can use named ranges. This makes it much easier to map data from the ER model to the correct spot in the Excel template. For example, we can name a cell “CustomerName” and then in ER, map the customer’s name to that named cell. This keeps things clean, readable, and flexible.
Now that you understand the basics, let’s move on to editing the Excel template.
Step 2: Edit the Excel Template
To make working in Excel easier, go to the View tab and enable Gridlines, Headings, and the Formula Bar. These tools help you clearly see where you are working, what the cells are called, and what formulas are being used. You can also turn on the Ruler to better manage spacing and alignment in the layout.

Next, find the section where the invoice lines are printed. This is usually a repeating range, which is used in ER to fill the data.
Look for the cell that shows the Item number.
You will use this area to insert a new column for the product image.

Step 3: Add a Product Image to the Layout
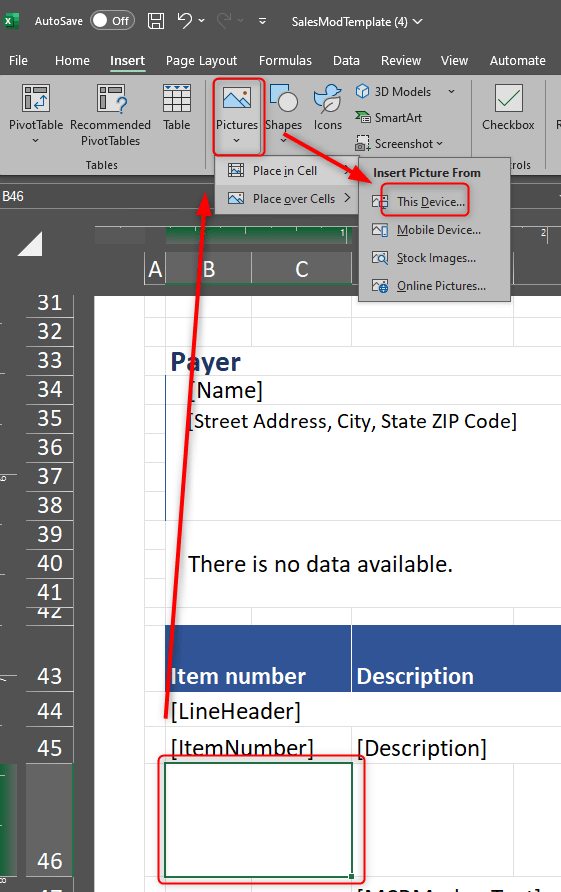
- Insert a new row below the Item number
- Merge first two cells where you want the image to appear, then extend it a bit to fit the image
-
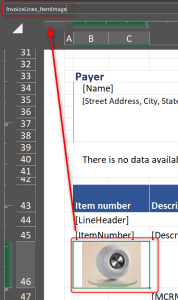
Select the new row you created, then define a named range that we’ll later use in the ER Format, let call it: InvoiceLines_ProductImages

-
Insert a sample picture into that range, select the cell, click Insert, and choose Picture
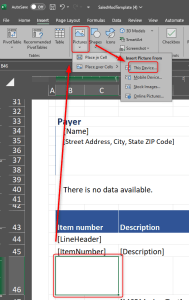
- Position the image properly inside the cell
-
Set the image name to InvoiceLines_ItemImage
-
Right-click the image, choose Size and Properties, and set:
Move but don’t size with cells
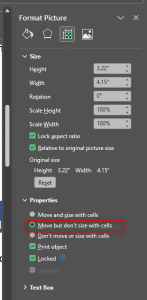

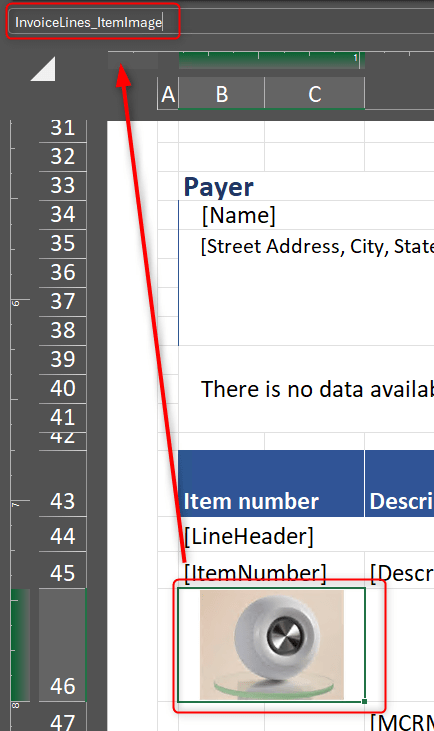
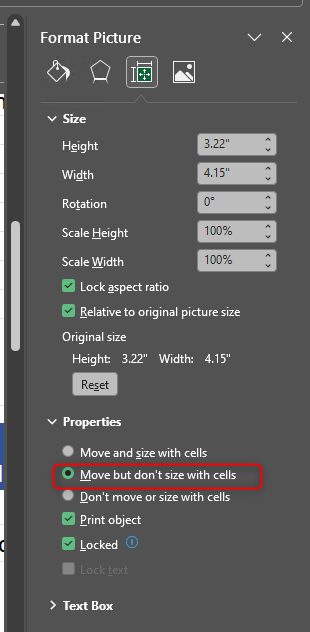
This ensures the image will align properly for each line item when printed.
Step 4: Save and Sync the Template
-
Disable all helper tools you enabled earlier (such as Gridlines, Headings, and the Formula Bar). You can also disable the Ruler if it was turned on.
This ensures the report layout looks clean when the report is printed or opened by users.
Excel remembers the last state of the file, so if these tools are left on, they will be visible when the report is generated. - Save the Excel file.
- Close the Excel file.
-
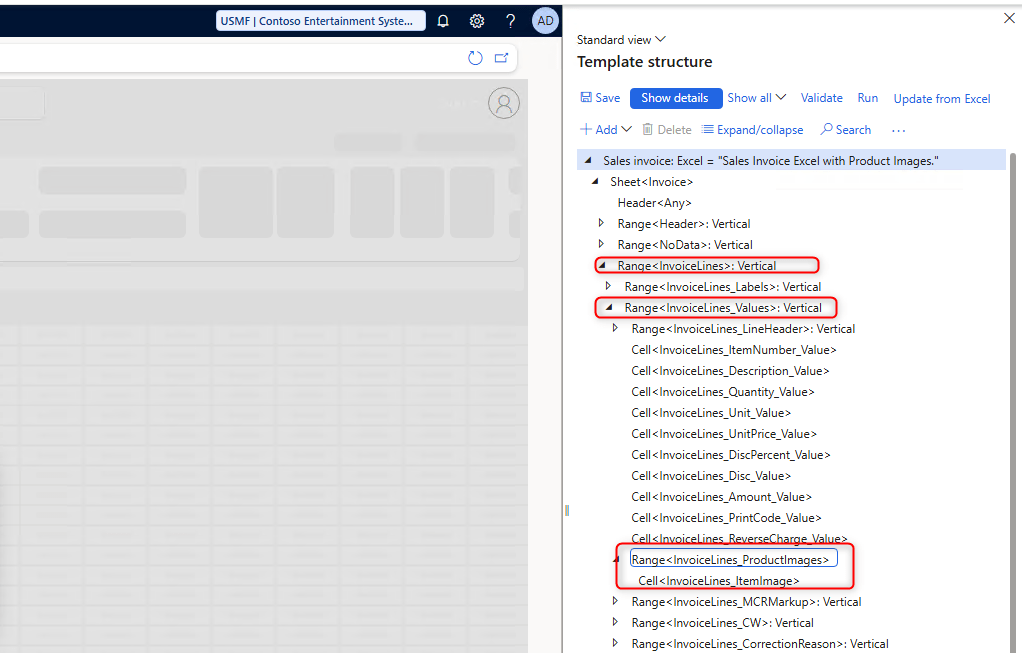
Go back to Business Document Management, click Sync stored copy, then click Update structure.
Check if your image and any new ranges were added correctly by clicking Show structure. - Finally, click Sync again to upload the updated layout.
Step 5: Bind the Image to the Picture Control
- Go to Electronic Reporting > Reporting configurations.
- Select your derived Sales Invoice format (e.g. Sales Invoice Excel with Product Images).
- Click Designer to open the Format Designer.
In the Format Designer, you'll see two panels:
- On the left, you see the structure of the ER format, which represents the layout of the Excel template.
- On the right, you see the structure of the ER data model, which contains all available data fields.
Now you need to bind the picture fields in the format layout (on the left) to the corresponding image field in the data model (on the right).
Locate the Invoice line section in the format layout where you added the image control in Excel. Then, bind this picture control to the correct image field from the model, such as ItemImageAsContainer.
Step 6: Link the Format to Your Custom Data Model
Before we continue with binding fields, let’s first explain what this step is about.
In Electronic Reporting, some fields in the report layout are based on Enums (enumerations), which are predefined lists of values like payment methods, document types, or QR code types. If you’re using a custom data model, you need to tell the format which version of these enums to use. Otherwise, the report won’t know how to work with your new fields.
So in this step, we’re linking the ER format to your custom data model by updating enum mappings.
Note: If you get any warnings at this point, don’t worry. They’re not important — they’ll disappear after we finish binding all the fields.
Follow these steps carefully. If you see any warnings, don’t worry; they are not important and will disappear once all fields are properly bound.
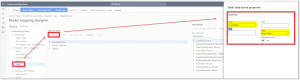
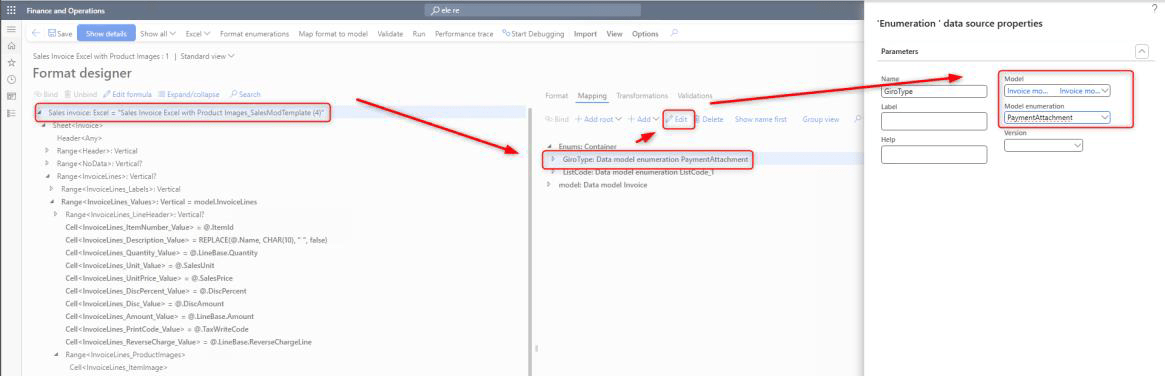
- In the Format Designer, on the right side under Mapping, click on the top node (for example, Sales Invoice: Excel).
- Then under Enums, locate GiroType.
- Click Edit, then set the Data model to your custom model (e.g. Invoice model – Docentric).
- Set the Model Enumeration to the matching enum in your model (e.g. PaymentAttachments).
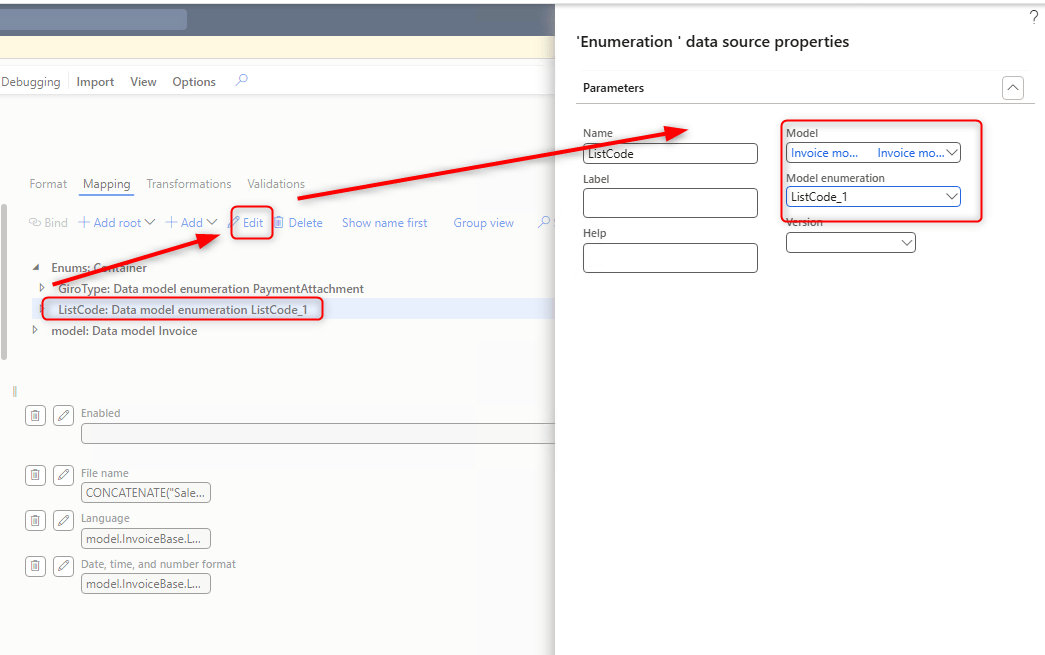
Now that GiroType is updated, do the same for ListCode:
- Under Enums, select ListCode.
- Again, click Edit, set the Data model to your custom model.
- For Model Enumeration, choose the correct value from your model (e.g. ListCode_1).
- Save your changes.
Step 7: Update the Data Model Reference
Now let’s continue and do the same for the ER Data model section.
- Still in the Format Designer, select the Data model node.
- Click Edit, then change the mapping to point to your custom data model.
- Set the Definition to SalesInvoice (or your corresponding model name).
- Click Save.
Step 8: Bind Data Model with Format
Now it’s time to bind our data model to the format layout. This means we’ll link the fields from the ER data model to the specific cells and ranges we added in the Excel template.
How to do it:
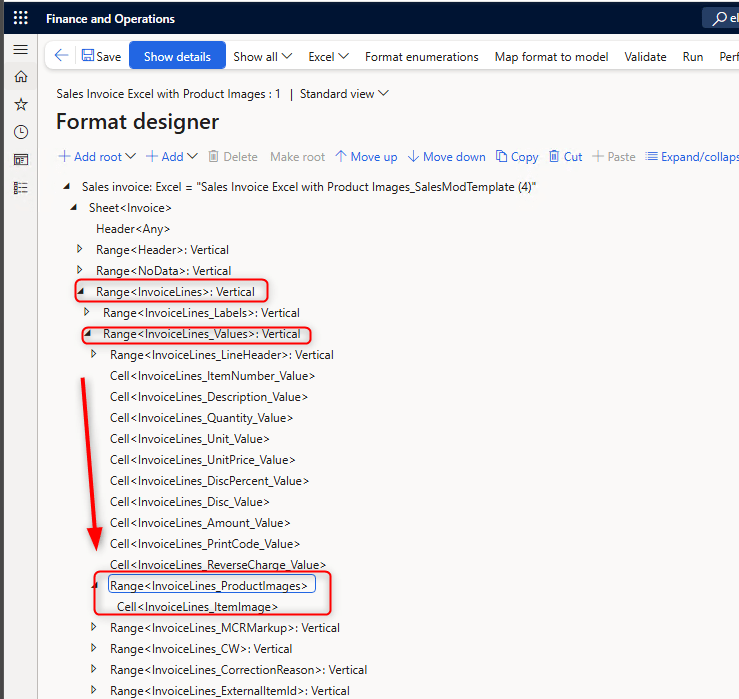
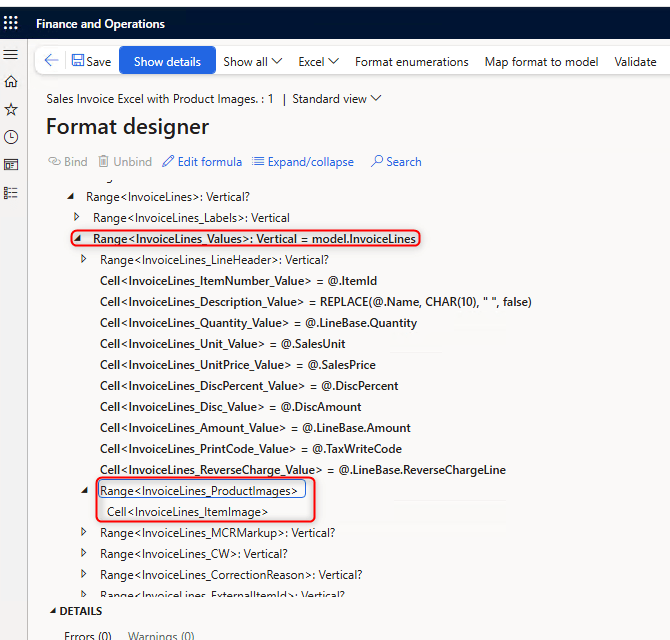
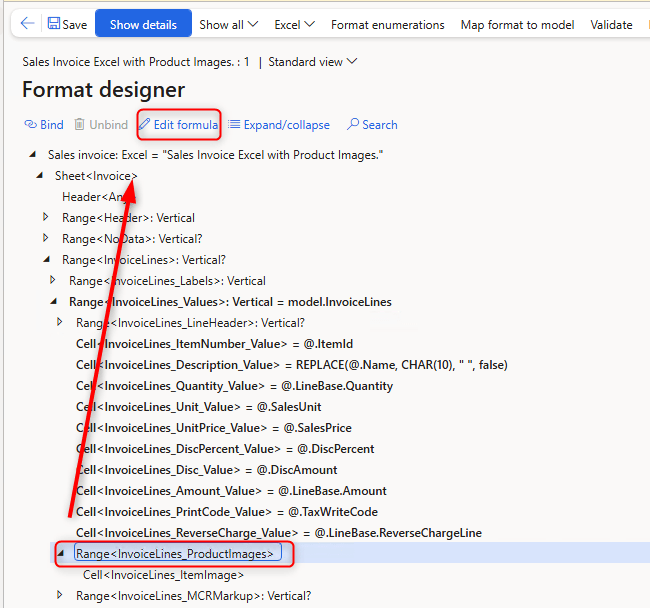
- In the Format Designer, go to the left panel where the Excel file structure (format layout) is shown. For now, we’re just locating the elements.
-
Find the range you added in the Excel template:
InvoiceLines_ProductImages -
Under this range, locate the cell you named:
InvoiceLines_ItemImage
This is the cell where the product image will appear in the Excel report.
-
Now let’s bind the condition to the ER Format:
We want to check if the item image is present. If it is, we’ll show the range. If not, we’ll hide it.- Select the InvoiceLines_ProductImages range on the left (Excel layout side).
- Click Edit Formula and enter this condition:
1@.IsItemImagePresent = TRUE

- The condition is done. Now let’s bring the actual image from the data model to the ER format.
-
Do the following steps to bind the image:
- In the Excel layout structure (left panel), click on the cell named InvoiceLines_ItemImage.
- In the data model mapping (right panel), expand the InvoiceLines node.
- Find the field ItemImageAsContainer.
- Bind the Excel cell InvoiceLines_ItemImage to ItemImageAsContainer.

Now your ER format is fully configured. You can run the report and check the result. If the item has an image, it will be shown. If not, the range will stay hidden.
We’ll go again into Print Management setup, set the format that we created, and then reprint the same invoice as we did in the beginning — and see what happens.
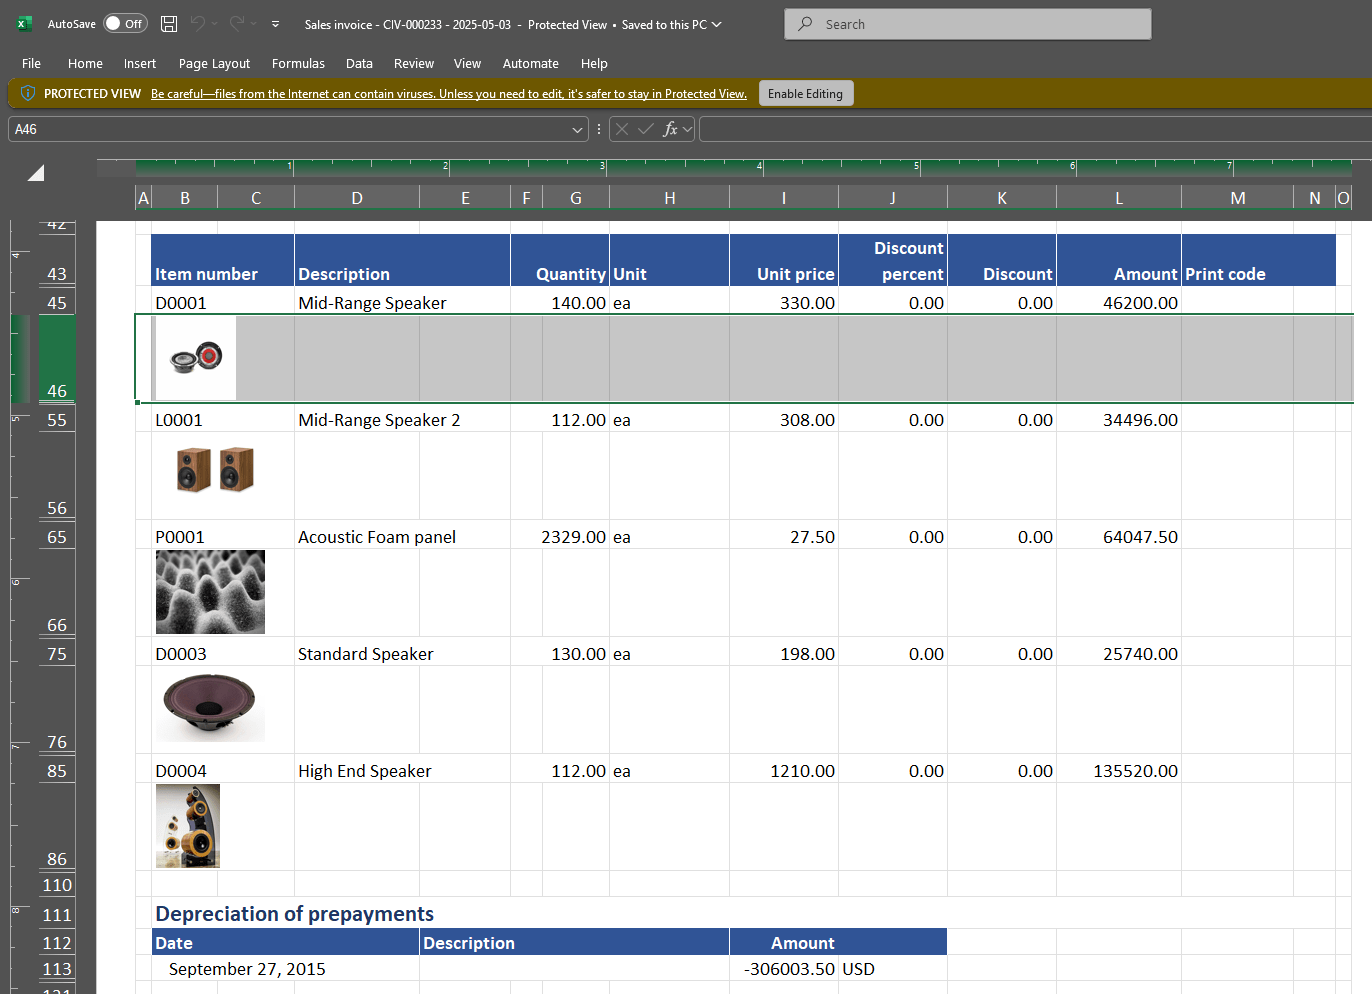
We’ve modified the format, and now we have the product image added to the Excel layout.
I’m not sure how it was for you, but for me, it took the whole day to set everything up in my Dev environment just to manage to update the format.
But now, let’s see how this is done in Docentric Designer, where we will also add the image and merge the product specification.
Display Product Images and Specifications with Docentric
In the previous chapter, we edited the ER format for Sales Invoice in Excel to display product images using Electronic Reporting (ER). Now we’ll take it a step further by using the Docentric Designer to include Product Specification documents in the invoice as well.
Your ER data model now includes both the product image and the specification document. It's time to display this content in the report layout using the Docentric AX Designer.
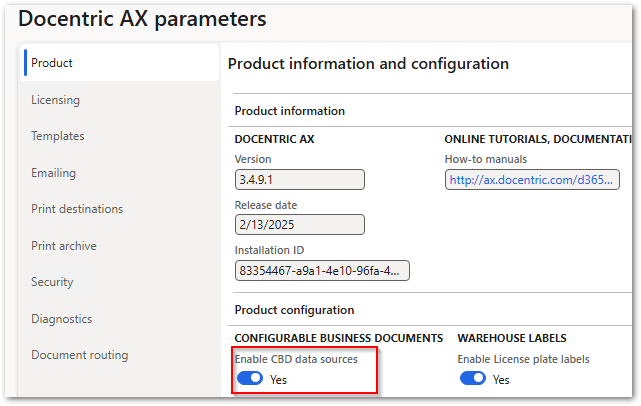
Step 1: Enable CBD Data Sources in Docentric (if not already enabled)
- Go to Docentric Parameters.
- Under the Product tab, make sure the Enable CBD data sources checkbox is set to Yes.
Step 2: Link the ER Configuration to the Docentric Sales Invoice Design
- In D365FO, open the Docentric workspace.
- Click on Reports to open the Docentric reports table.
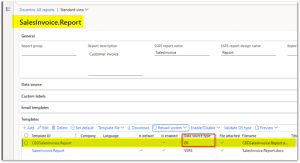
- Find the SalesInvoice report. If it's not listed, click Add to create it.
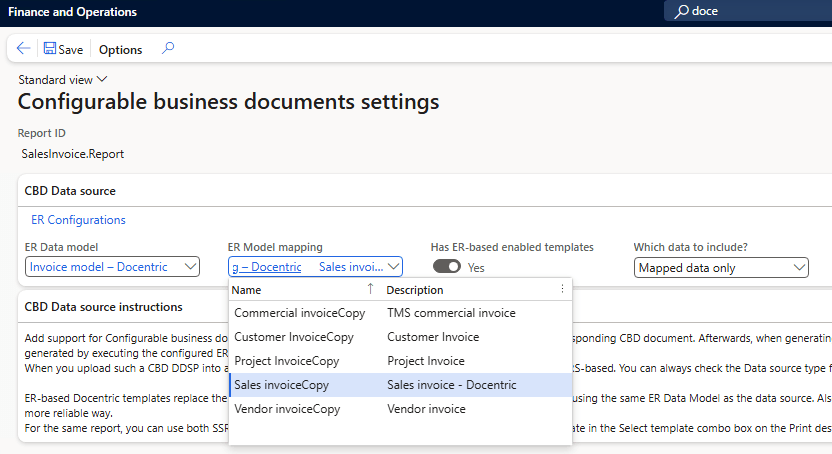
- In the report setup form, click Configurable Business Documents settings under the Data Source section.
-
Update the following settings:
- Set CBD Data Source to Invoice model – Docentric
- Set Model Mapping to Sales Invoice Mapping – Docentric.
Step 3: Download and Open the Template in Docentric Designer
-
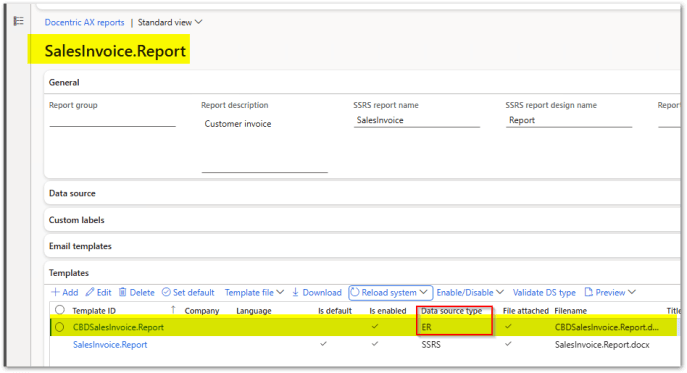
In the Template section, verify if a template using the ER data source exists. Make sure the template is set as the default.
Note: Templates based on SSRS will not work with ER data sources.
- If no suitable template is available:
Download one from the Docentric website or install the correct replica (CBD model). - Select the template and click Download.
- Open the downloaded template in Microsoft Word with the Docentric Add-In.
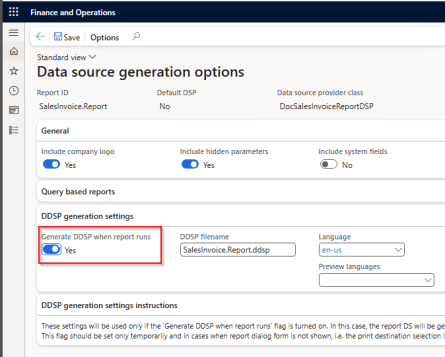
- Go back to the template setup in D365FO and under Data Sources, click Generation Options.
-
Enable the checkbox "Generate DDSP when report runs".
- This ensures a fresh DDSP file (data source file) is created every time the report runs.

-
Open Print Management for the Sales Invoice document:
- Set Format to SalesInvoice.Report so that Docentric handles rendering.
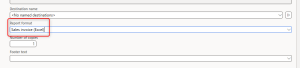
- Set Print Destination to Docentric Screen (must be a Docentric destination).
Step 4: Load New Data into the Template
- Go to the Invoice Journal, select a posted invoice, and click Use print management to print.
- This will run the report and download a fresh .ddsp file, which will also include the newly added fields.
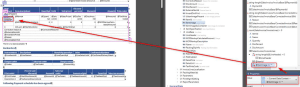
- In Docentric AX Designer, go to the Docentric tab and click Load Data Source.
- Select the newly downloaded DDSP file.
- Once loaded, verify that you can see the ItemSpecification node and image fields (like ItemImageAsContainer) under SalesInvoiceLines.
Design the Invoice Layout in Microsoft Word Using Docentric
Now that the DDSP file is loaded in the Docentric Designer and you can see the new fields, it’s time to design the layout that displays product images and specifications.
Step 1: Insert the Product Image into the Layout
- In the template, find the row where the ItemId is shown. This is inside the invoice lines section.
- Click inside the same cell and press Enter to add a new line below the ItemId.
-
In the new line, insert an IF tagging element with this condition:
@ItemImage != ""
This makes sure we only show the image if it actually exists.
- Inside the IF element, insert an Image tagging element.
-
Bind the Image tagging element to the ItemImage field from the data source.


That is all you need to do. Now run Preview in Docentric to test the output. If the invoice line has a product image, it will be shown in the report.
Step 2: Add Product Specification Documents
Now we’ll add the actual product specification documents to the end of the invoice. These documents will only appear if at least one invoice line has a product specification attached.
Step 2: Create a Section for Specifications
- Scroll to the end of the template in Microsoft Word. This is where the product specification section will be inserted.
- Insert an IF tagging element with the following condition:
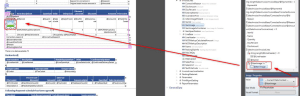
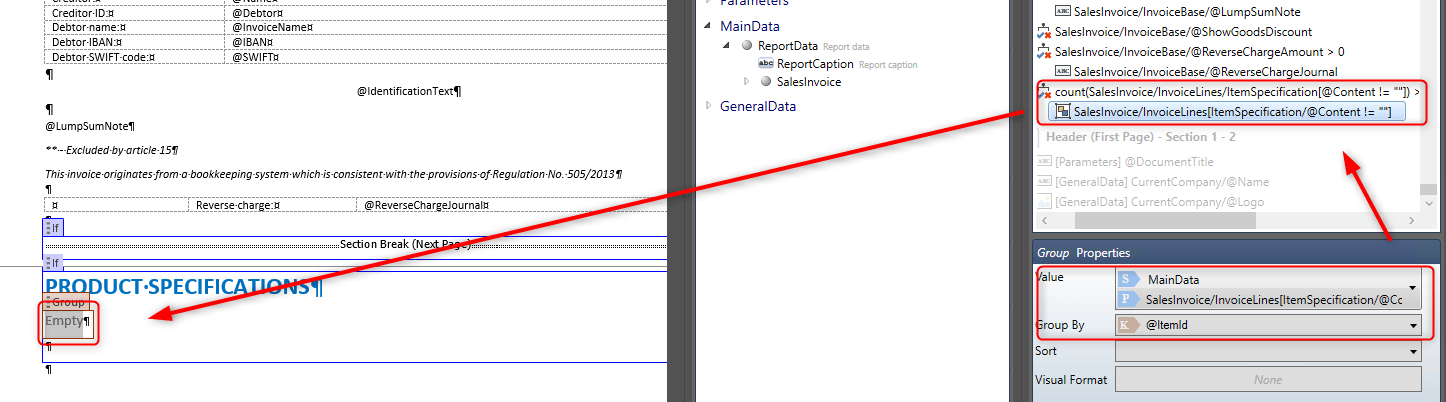
1count(SalesInvoice/InvoiceLines/ItemSpecification[@Content != ""]) > 0
This ensures that the section only appears when at least one product has a specification attached. -
Inside the IF element, place the cursor on the first line, then go to the Layout tab in Word and choose:
Page Setup > Breaks > Section Break (Next Page)
This creates a new page for the specifications. -
At the top of this new section, insert a heading: PRODUCT SPECIFICATIONS
(Format this using your document style guidelines and branding.)

Step 3: Add the Specification Content
- Below the heading, insert a Group tagging element.
-
Bind the Group element using this expression:
1SalesInvoice/InvoiceLines[ItemSpecification/@Content != ""]
This will filter lines to only those with specifications. - Set the Group By key to: ItemId
Step 4: Show the Specification File
- Inside the Group element, insert a Subdocument tagging element.
-
Bind it to this expression:
1InvoiceLines[1]/ItemSpecification/@Content
This will insert the specification file for each product.

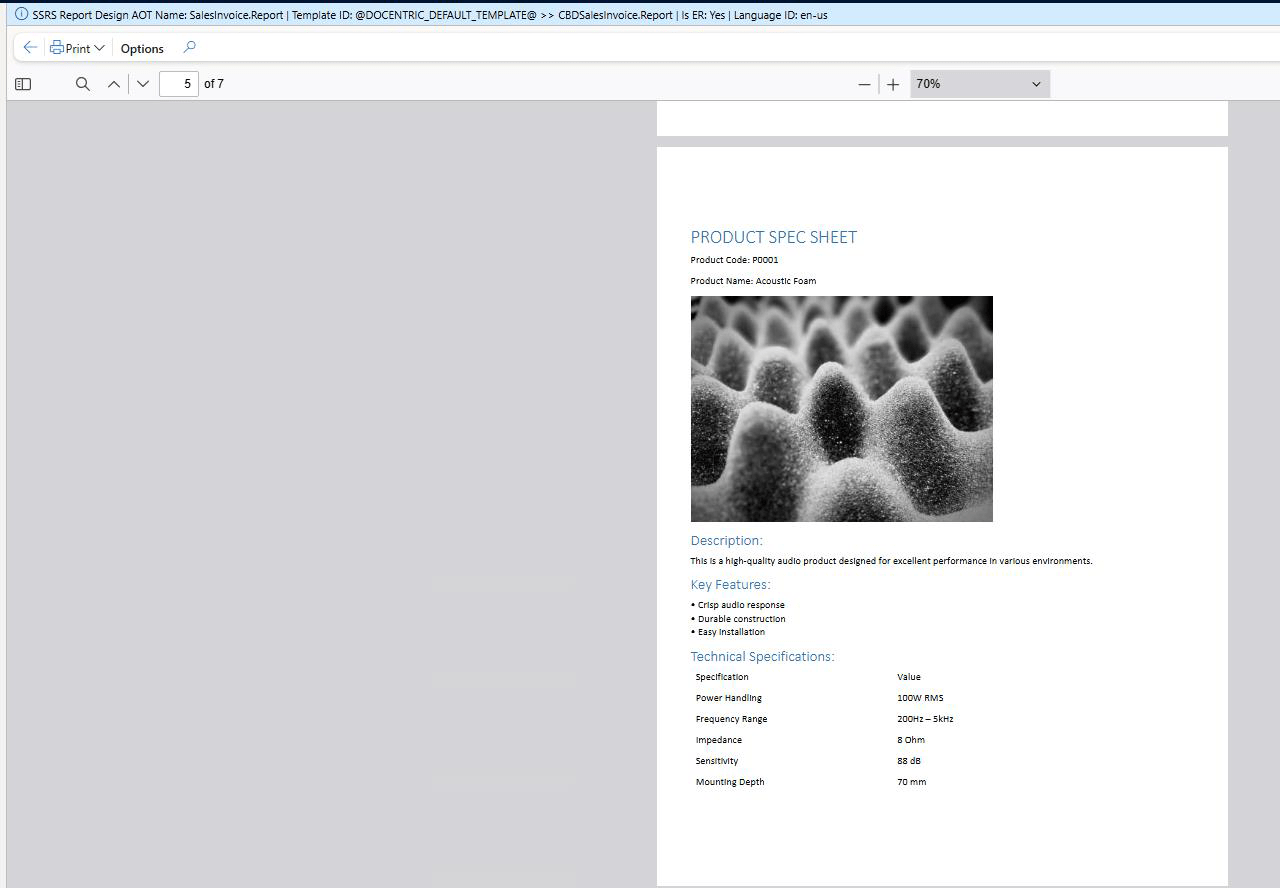
Step 5: Test the Output
- Run a Preview of the report.
- Verify that Product images display correctly under each invoice line. And Specification documents appear at the end of the invoice if available.
- Optional: You can insert a Page Break after each specification document for better clarity.
Step 6: Upload the Template and Test the Report
Now that your layout includes product images and product specifications, it's time to upload the template back into Dynamics 365 Finance and test it.
- In Microsoft Word, save the Docentric template you just designed.
- Go to the Docentric AX workspace in D365FO.
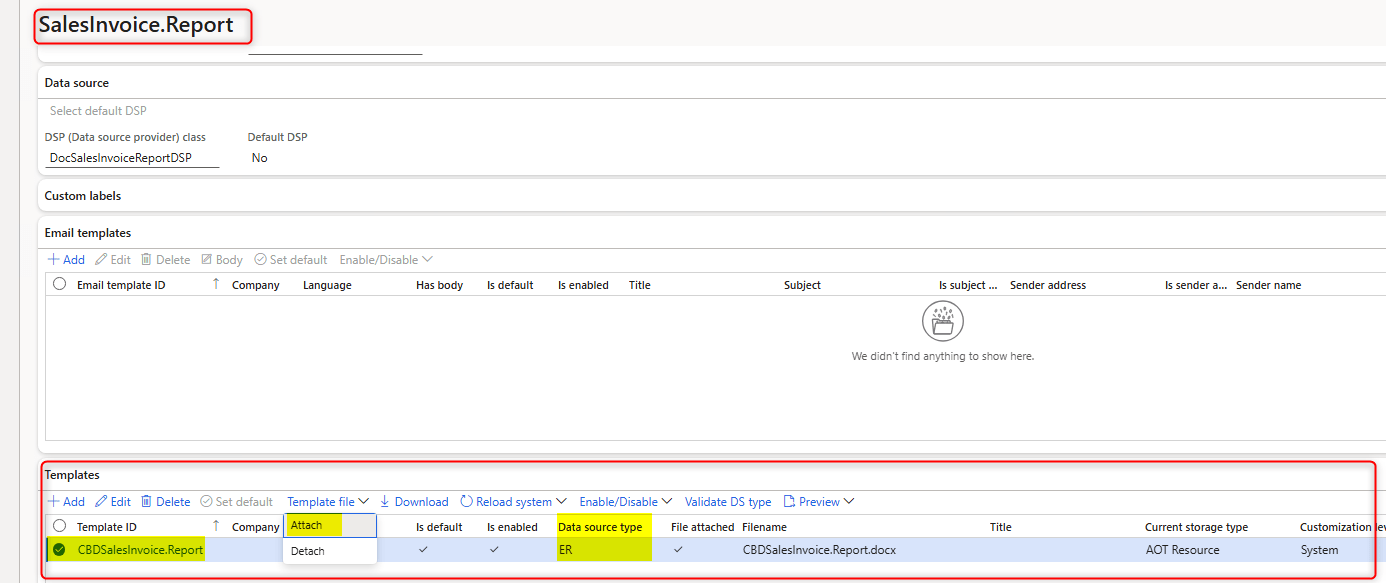
- Open Report Templates and find the SalesInvoice report in the Docentric report table.
- In the Templates section, find the template already added with CBD source. Click Template file > Attach and upload the saved .docx file.
- Set it as Default if it’s not already.
Step 7: Test the Newly Added Template in D365 Finance Environment
- Go to Accounts receivable > Invoices > Invoice journal.
- Find a posted invoice that includes products with attached images and specifications. As I prepared all my images and product specifications for report CIV-000262, I will print this one.
- Click Use print management to print the invoice.
- Make sure the Print destination is set to Docentric Screen and the format is SalesInvoice.Report.
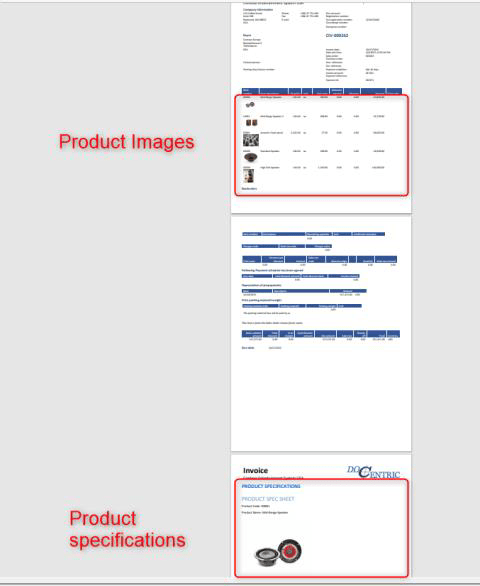
Expected result:
- Product images are shown under each invoice line (if available).
- Product specification documents are appended at the end of the report (if available).
If anything is missing, double-check your data bindings in the template and verify that the DDSP file includes all expected nodes.
Final Thoughts
You made it to the end! Just like the tool supplier in our story, you now have a better-looking invoice that gives customers more helpful information. By adding pictures and product specs, you made the invoice easier to read and more professional. And the best part is, you did it all without writing any code. Great job. Keep learning and improving. There’s always something new you can do to make your documents even better.