We had this interesting case with a customer where they were storing multiple file download links in a single data field. The field looked messy at first— just one long string with several URLs separated by semicolons.
Something like:
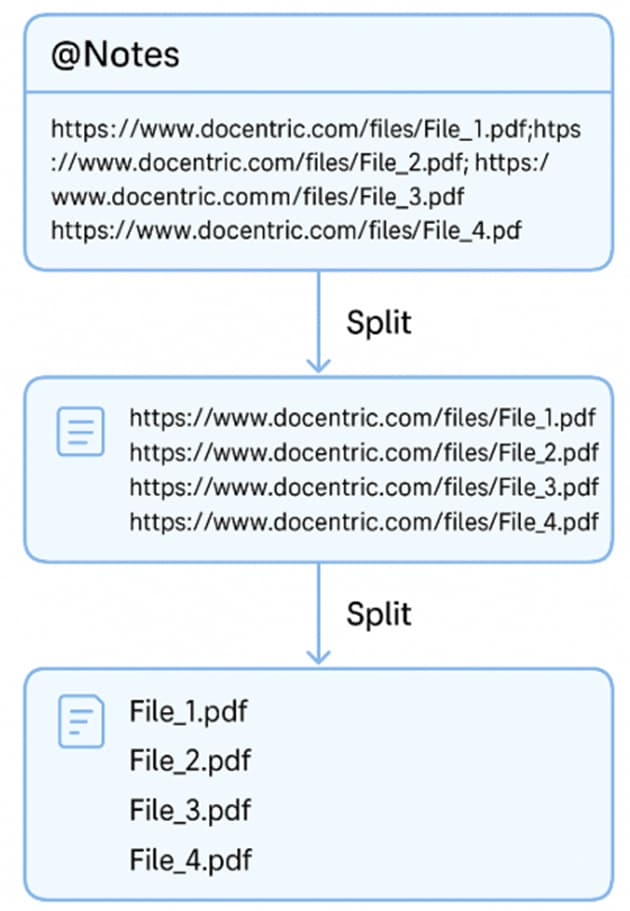
@Notes='https://www.docentric.com/files/**File_1.pdf**; https://www.docentric.com/files/**File_2.pdf**;https://www.docentric.com/files/**File_3.pdf**;https://www.docentric.com/files/**File_4.pdf'
Now, the request sounded simple, but doing it was a bit tricky.
They wanted these links to show up as clickable hyperlinks on the report. Each link should display just the file name (like File_1.pdf), and when you click it, it should open the correct file.
So, instead of one long string, the final report should show:
File_1.pdf
File_2.pdf
File_3.pdf
File_4.pdf
![]() Now, how can we do this? Let’s break it down step by step:
Now, how can we do this? Let’s break it down step by step:
-
Take the string from the field, for example @Notes.
This field contains all the links in one long string. -
Check if the field contains any URLs.
Make sure @Notes includes “http://” or “https://”.
If it doesn’t, then there’s nothing to show. -
Split the string by semicolons (; ).
This gives you a list of individual URLs. -
Loop through each URL in the list.
-
Inside the loop, split the URL by the last
/to get the file name. -
Use the full URL as the clickable link and the file name as the visible text.
![]() Let’s now build this in Docentric Designer
Let’s now build this in Docentric Designer
Step 1: Use the Field with the URLs
We are using the NotesLine_FR field.
I have added several download links, all saved in a single line as a string, separated by semicolons (;).

Step 2: Add a Table and an If Condition
Insert a new table with two rows in your template.
In the second row, add an If tagging element.
This condition will check if the NotesLine_FR field contains any links or PDF files.
Use this XPath expression as the condition:
contains(SalesInvoiceHeaderFooterTmp/@NotesLine_FR, '//') or
contains(SalesInvoiceHeaderFooterTmp/@NotesLine_FR, 'pdf') or
contains(SalesInvoiceHeaderFooterTmp/@NotesLine_FR, 'PDF')

Step 3: Add a List Tag to Split the URLs
Inside the If tagging element, add a List tagging element.
Here’s a little trick: use the string-split() function to split the full string by semicolon. This will turn one long string into multiple items — one URL per line.
Bind the List tagging element to this XPath expression:
string-split(SalesInvoiceHeaderFooterTmp/@NotesLine_FR, true(), ';')

Now you can loop through each link separately.
Step 4: Declare Two Variables
Inside the tagging element where we split the URLs, we need to create two variables.
First, add a variable called curVal. Set its expression to:
current()
This will hold the current URL value from the split string — one URL at a time.
Then add another variable called fileName.
Set its value to an empty string for now. We will use it later, after we extract just the file name from the full URL (for example, File_1.pdf).

Step 5: Extract the File Name from the URL
Now insert a nested List tagging element below your variables.
This second split will break the URL into parts using the / character.
Use this expression:
string-split(var-element-value('curVal'), true(), '/')
Inside this nested list, pick the current item. This is the actual file name, and you store it in the fileName variable.
Set the value of fileName to:
current()
This stores the last part of the URL, which is the file name itself. You will see a red exclamation mark next to this List tagging element.

Don’t worry, this will not affect functionality. It simply means that there is no real data available at the moment.
Once the report is run with actual data, the binding will work as expected.
 Pro Tip: Understand What Happens When We Split the URL
If Step 5 wasn’t clear at first, you’re not alone! Many users find this tricky until they see actual data.
Let’s break it down with an example:
Suppose the current URL is:
https://www.docentric.com/files/File_1.pdf
When we run this XPath expression:
string-split(var-element-value('curVal'), true(), '/')
It splits the URL into a list like this:
[“https:”, “”, “www.docentric.com”, “files”, “File_1.pdf”]

Each part of the URL is now a separate item. The last item (File_1.pdf) is what we want — it’s the actual file name.
That’s why we insert a nested List and use current() inside it, we are walking through each part of the URL, and the last one is the file name.
We store it into the fileName variable using:
current()
Step 6: Display the File Name as a Clickable Link
Now we need to exit the nested list and return to the parent list. Then, we will add a new Hyperlink tagging element and bind it to the current item in the list of URLs.

Inside the Hyperlink tagging element, we add a Field tagging element to display the file name. We bind this field to var-element-value('fileName'), so the file name shows as the clickable link text.

This way, the file name appears as a clickable hyperlink, and when you click it, the file from the URL will open.
To finish, we just change the text color, make it italic, and underline it. The template is now complete and shows file names as clickable links. When you click a name, the correct file will open.

Summary of Xpath Functions Used
- string-split() – Used to split a long string into smaller parts.
- First, we split the URLs using ;
- Then, we split each URL using / to get the file name.
- current() – Gets the current item in a list.
- We used this to get each URL and later to get the file name.
- var-element-value(‘…’) – Used to read the value of a variable.
- We used this to show the file name and set the link target.
Sample-Extract File Names from URLs Using XPath.docx (66.7 KB)