Typically when designing report templates with Docentric, the Table Header row borders the List tagging element, as seen in the screenshot below.
For that reason, if we wanted to apply a bottom border to the Table Header, the border would repeat with every record the List tagging element is bound to (in this case, with every SalesInvoiceLines record).
We can easily solve this by adding a new, empty table row after the Table Header to separate it from the List tagging element, and applying a top border to it instead. I’ve showcased the solution in my test template: Header Border Example.docx.
To only apply the border to the Table Header, please follow these steps:
-
Select the entire Header row and remove the bottom border.
-
While the Header row is still selected, right-click on it and select Insert < Insert Rows Below.
-
Apply a top border to the empty row below the Table Header row.
-
Select the entire empty row, go to the “Home” Word tab, and change the font size to 1.
-
While the empty row is selected, open the Paragraph settings.
-
Under the Indents and Spacing change the Spacing Before and After to 0 pt, and make sure the Line spacing is set to Single.
-
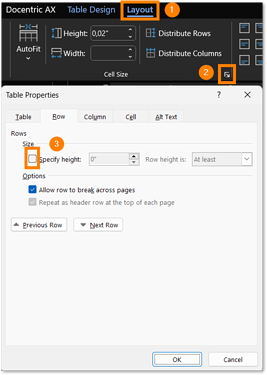
Go to the Layout tab, select Table Properties, and under the Row tab make sure the Specify height option is unchecked.
Header Border Example.docx (152.6 KB)


