
 Tags: Attachments, D365FO, Emailing, Full Edition, Print destinations
In this article, we will explain how to set up the emailing process of purchase orders using Docentric to achieve the following scenario. We want our outgoing emails, which are automatically generated by D365FO, to have an additional document attached – Terms and Conditions (T&Cs).
Furthermore, instead of sending out these emails with the attached PO and T&Cs automatically, by using D365FO Email providers such as Exchange Online or an SMTP server, we will configure the emailing process to be manual. This means that each email message with PO and T&Cs will still be automatically generated but not sent to the recipients. Instead, it will be downloaded in the browser. Such an email we can then open in Outlook, review and modify by adding some useful information, additional images, attachments or recipients, and once we are satisfied with how it looks, send it manually.
Set up email print settings
Because Purchase order is a Print management report, we will edit its Print management settings first. Open the Docentric AX reports form (Docentric AX > Reports) and select PurchPurchaseOrder.Report. Next, click the Print management menu item, as shown in the image below.

On the Print management setup form select the wanted settings for Purchase order and open the Print destination settings form.
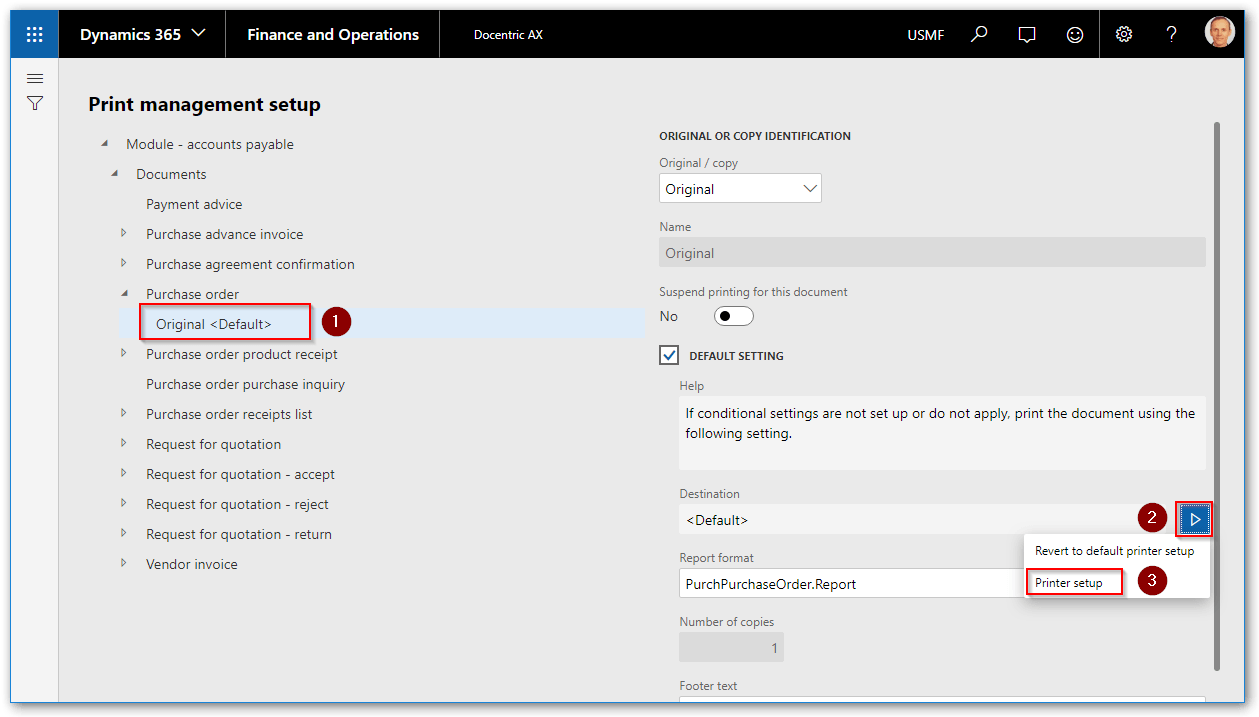
Make sure that you select Docentric’s print destinations.


Now we will select the Email print destination and start composing the email settings.
Report template selection
Template selection varies depending on Docentric AX Edition. Free Edition works with SSRS report designs only. Full Edition works with both SSRS and Docentric designs (aka templates).


Learn more about using built-in SSRS reports with Docentric print destinations >>
Email recipients

Set the vendor’s primary contact email (@@) as the email recipient.
Note that you can have more than one recipient if needed. You can combine email tokens from the drop-down options in the To field, and you can also manually add email addresses. So your To field might have the content like this: @Business@;@@;@Purchasing Agent@;joe@somecompany.com.
Email subject
In the Subject field you can combine any text with placeholders, which will be replaced with the corresponding data at runtime.

When you click the Placeholder button, you will get the list of all available placeholders, where you can select those that you need. The lower pane of the form displays names of the selected placeholders, which you can copy and paste into any field on the Print destination settings form.


Open email before sending
Setting this checkbox to Yes will instruct D365FO to download the outgoing email message in your browser instead of sending it to the email recipients automatically. This is a super-cool feature, because now you can open the downloaded email message (as an EML file) in Outlook, change it to meet your needs and send it when it is ready.

Attachment name and type
This attachment refers to the report which will get attached to the email. We can use placeholders in the filename and choose among available output file formats.

Cc, Bcc and From
The rules for setting the Cc and Bcc fields are the same as described earlier for the To field.

The From field specifies the sender of the email but also triggers a selection of the email account which will be used for emailing. There are many options and combinations possible that are beyond the scope of this article.
Learn more on how to use different From accounts >>
We will leave this field empty, so the default email sender account defined in Email parameters will be used.
Email body
Easy-to-use HTML editor gives you many formatting possibilities to make your email body look appealing. You can expand the editor across your screen for comfortable editing. To make the body dynamic, you can also use placeholders.


Additional attachments
We want to include the General Terms and Conditions document for each purchase order. This document is stored as a Global attachment of the current company, USMF (see the images below).


Now create a rule that will result in the selection of this document in the runtime, and attaching it to outgoing emails in addition to the generated purchase order, which is attached by default.


Email a purchase order
Now we’re all set to go ahead and test if our settings behave as expected. Open the All purchase orders form, select one confirmed order and click the Purchase order confirmations menu item in the PURCHASE tab.

On the Purchase order confirmations form now click the Preview/Print button and select Use print management. The report starts executing and the client’s browser downloads the generated email message as an EML file, which we will then open in Outlook.


This is our email message generated by Docentric. We can now review it, change it as we want, add or remove attachments, just as we normally would do when creating an email message by hand. When we are satisfied with the message, we can send it.
As you can see, you have many possibilities when using Docentric’s Email print destination. You can dynamically bring in useful and report-related information by using placeholders. With the help of the Email body editor, you can make your emails look professional and appealing. Keep in mind that with Free Edition you can use all emailing capabilities except setting up additional attachments such as T&Cs on the Print destination settings form, which you can still use via X++. Learn how >>
See also
Email an invoice with additional attachments from D365FO >>
Email invoices with Company logo in the email body in Dynamics 365 for Finance and Operations >>
Email or print an invoice from D365FO, depending on the customer’s email address availability >>
Confirm that your customers received their invoices via email by requesting read receipts in D365FO >>