
 Tags:
Tags: 
In the standard D365FO Electronic Reporting (ER) report for Sales Invoice, line charges are given as a summary value, but it is a common requirement to print the detailed line charges specification. This article will guide you through the steps you need to perform to customize the D365FO electronic reporting invoice model mapping, so that you add the line charges to the corresponding invoice lines in the report datasource. Once we customize our ER model mapping, we will see how to test it and how to present the new information on the report design.

The standard ER model for the Sales Invoice report already contains the Markup transaction record list as a child node of an Invoice line, but if you check the corresponding model mapping you will notice that it isn’t bound to any datasource (not bold = not bound).

If we want to bring the line charges records to our report datasource, we need to customize the model mapping configuration and bind this MarkupTransaction record list to a list of line charges. As you know, it isn’t possible to directly customize the original configuration provided by Microsoft. Instead, we need to derive a new model mapping configuration from the standard one and customize the derived configuration.
Analyze the D365FO data model
For this task we will use the example of one Sales Invoice with two lines, each line having 2 charges lines as presented on the image below:

We will start by analyzing a posted invoice and implementing the customization for that case. (We will extend this model to also support the proforma scenario in another article). For a posted sales invoice, the table relations are:
- Report datasource record for sales line (SalesInvoiceTmp)
- Posted sales line (CustInvoiceTrans related to SalesInvoiceTmp record).
Note: Identifying this transaction is easy with Docentric because we extended the SalesInvoiceTmp table with the JourTransRecId_DR field, which keeps track of the corresponding transaction line. - Charges (MarkupTrans records related to CustInvoiceTrans). Its TransTableId and TransRecId fields point to the related CustInvoiceTrans record.
Identify important nodes in the standard ER model mapping
Our top-level record is SalesInvoiceTmp, so now let’s analyze the standard ER model mapping configuration for the Sales Invoice and see where the corresponding data source can be found. This is how the standard configuration looks:

I am using the Group view, which is why in the middle we see the Data Sources pane with 3 datasource types. This means that in the standard configuration only these 3 types have been used so far. Don’t worry, we will add a few more!
You should bear in mind that the ER Sales Invoice datasource relies on the SSRS Sales Invoice datasource. And where does the main SSRS data fetching occur? In the SalesInvoiceDP class. So, we should first find an instance object of this class, therefore let’s expand the Objects node and look for this object:

As you can see, a data source named ReportDataProvider, which is an instance object of the SalesInvoiceDP class, already exists in the standard model mapping. If we expand it, we automatically get a list of all available class instance methods. The most interesting for us will be getSalesInvoiceHeaderFooterTmp() and getSalesInvoiceTmp(), as they will return the report datasource records (header and lines) as we know them from SSRS. In this model mapping, everything else is built around the SSRS report datasource records.
Locate the invoice lines in the model mapping
Fine, we identified the entry data for our report. Now let’s track what happens further with our lines, the result of invoking the getSalesInvoiceTmp() method. Judging from experience, the most interesting data sources are usually under the Calculated fields node, so let’s expand it and analyze the available calculated fields. As you can see, the result of executing the ReportDataProvider.getSalesInvoiceTmp() method is the $SalesInvoiceTmp calculated field (the first of the yellow marked calculated fields in the below image). This calculated field holds all our sales invoice lines.

There are some other similarly named calculated fields, for example SalesInvoiceTmp_Lines, SalesInvoiceTmp_Markup, SalesInvoiceTmp_Backorders, etc. If we check the formula for SalesInvoiceTmp_Lines, we see that it represents a collection of SalesInvoiceTmp records where Qty is not zero. This means that it carries the actual transaction lines, in other words: that is our report datasource line we were looking for.
Note: the other similarly named calculated fields are specialized Backorders, Markup, Prepayment, etc. lines.
Add the CustInvoiceTrans record
Based on the data model presented earlier, the next level below the SalesInvoiceTmp_Lines record is CustInvoiceTrans with the relation:
CustInvoiceTrans.RecId == SalesInvoiceTmp_Lines.JourTransRecId_DR
We will add a new Calculated field data source for the related CustInvoiceTrans record. But before we add this calculated field for the related CustInvoiceTrans record, let’s think one step in advance. Once we add the calculated field, we will need to provide the formula that will identify the linked CustInvoiceTrans. We know its RecId, it is SalesInvoiceTmp_Lines.JourTransRecId_DR, so we can find it by its RecId and by using the static table method CustInvoiceTrans::findRecId().
If we plan to use a static table method, we first need to add that table as a Table data source type to our Data sources. We do it by performing the following steps:

- Select any top-level node in the Data sources pane
- Select the Table data source type
- Click Add root → a dialog opens, where we specify the data source name (use some meaningful name, in this example I used CustInvoiceTransTable) and the table name (CustInvoiceTrans). We confirm the entered values by pressing OK in this dialog.
- As a result, a new data source appears in the Data sources pane. After that, we will be able to use its static methods in the formulas.
If we expand this new node, we will see the findRecId() static method we are interested in:

Now we can add the calculated field for the CustInvoiceTrans record. We can add it on the same level as other already existing calculated fields, but I find it easier to understand and follow the relationships if I add it as a sub-node of the SalesInvoiceTmp_Lines node. We perform the following steps:

- Select the SalesInvoiceTmp_Lines node because we want to add a sub-node to it.
- Select the Calculated field data source type
- Click the Add button → a dialog appears
- Specify the calculated field name as $CustInvoiceTransFromTableDef (I used the name which tells me that I will apply the methods from the table definition; also note the convention of using a $ sign as a first character of calculated fields’ names)
- Click Edit formula
In the formula editor we first add the method:
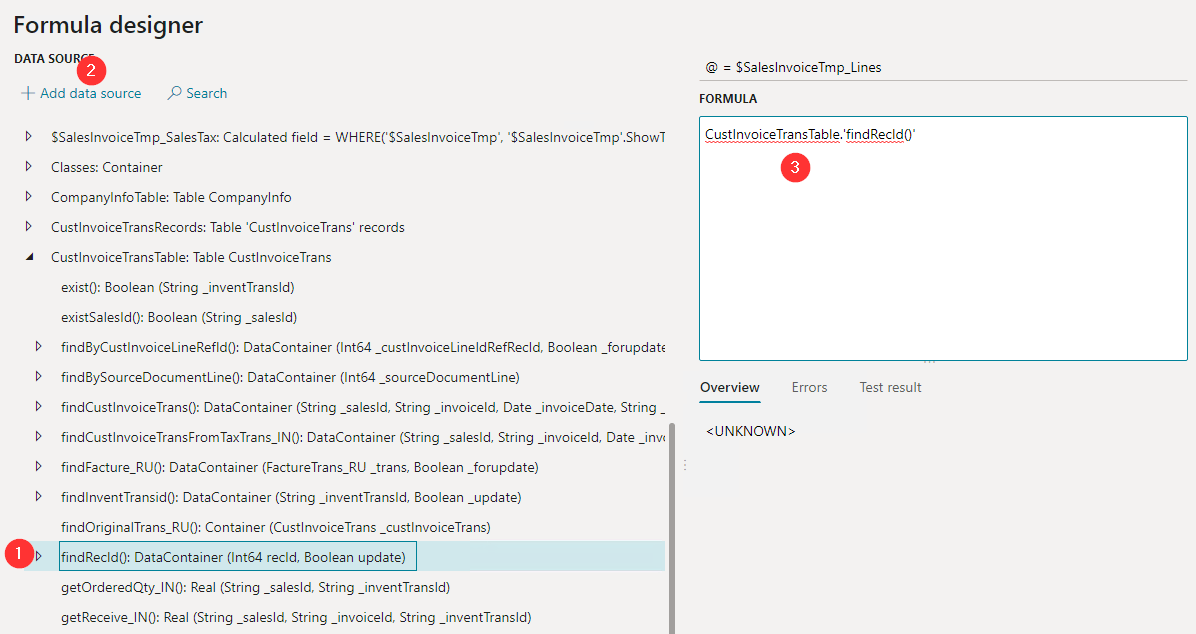
- We find the CustInvoiceTransTable and its findRecId() static method
- We click the Add data source button
- The following formula automatically appears in the formula editor: CustInvoiceTransTable.'findRecId()'.
You can also manually enter or edit the formula.
Now we need to provide the parameter for the findRecId() method:

- Manually enter the open bracket character (the method parameter will be within the brackets)
- Expand the $SalesInvoiceTmp_lines data source and select the JourTransRecId_DR field
- Click the Add data source button
- The correct parameter expression is automatically added to the formula editor. Notice that the Add data source button always adds the corresponding content to the end of formula in the formula editor.
- Manually enter the closed bracket character
- Save
- If the formula is correct, the expanded expression appears at the bottom of the formula editor and you can close this form, otherwise the error is displayed.
After closing the formula designer form, we see our newly added calculated field as:

If we refer to our data model, we have successfully linked the first table, CustInvoiceTrans:
- Report datasource record for sales line (SalesInvoiceTmp)
- Posted sales line (CustInvoiceTrans related to SalesInvoiceTmp record).
- Charges (MarkupTrans related to CustInvoiceTrans).
Now we need to link the Charges lines.
Add the MarkupTrans records
We will add a new calculated field as a sub-node of our CustInvoiceTransFromTableDef calculated field. Let’s first see what kind of formula we will use, so we can add the necessary data sources in advance.
If you analyze the CustInvoiceTrans table, you will notice it has an instance method getMarkupTransactions(), here is its implementation:
|
1 2 3 4 5 6 7 8 9 10 11 12 13 14 15 16 17 18 19 |
/// <summary> /// Gets all <c>MarkupTrans</c> records linked with current record. /// </summary> /// <returns><c>RecordLinkList</c> containing all found records.</returns> [ERTableName(tableStr(MarkupTrans))] public RecordLinkList getMarkupTransactions() { MarkupTrans markupTrans; RecordLinkList recordList = new RecordLinkList(); while select markupTrans where markupTrans.TransTableId == this.TableId && markupTrans.TransRecId == this.RecId { recordList.ins(markupTrans); } return recordList; } |
It should be possible to use this method directly on our transaction, but let’s demonstrate another approach instead. We will FILTER the MarkupTrans table records in a way similar to the SELECT statement in the above implementation. As explained earlier, if we want to fetch the MarkupTrans records, we need to add the Table records data type and reference the MarkupTrans table:

We will perform the following steps:
- Select any top-level node in the Data sources pane
- Select the Table records data source type
- Click the Add root button
A dialog opens, where we specify the name of our new data source and the referenced table:

Now it is possible to reference the records from this table in our calculated fields, so let’s add the new calculated field:

- Select the CustInvoiceTransFromTableDef calculated field in the Data sources pane
- Select the Calculated field data source type
- Click the Add button → a dialog appears
- Enter the name of a new calculated field: $MarkupTransWithFilterv
- Click the Edit formula button
In the formula editor enter the following formula and click Save:
|
1 2 3 4 |
FILTER(MarkupTransRecords, AND(MarkupTransRecords.TransTableId=TABLENAME2ID("CustInvoiceTrans"), MarkupTransRecords.TransRecId=@.RecId) } |
With this formula we are filtering only those MarkupTrans records where TransTableId and TransRecId point to our CustInvoiceTrans record. It is the same condition as the one used in the previously presented CustInvoiceTrans.getMarkupTransactions() method.
When we close the formula editor, we see the following structure below our SalesInvoiceTmp_Lines datasource:

The last calculated field is the one we want to bind to our markup transactions in the data model.
Bind the data source to markup transactions
We bind our new calculated field to the MarkupTransactions record list in the data model by executing the following steps:

- Select the data source, in our case the newly added $MarkupTransWithFilter calculated field
- Select the data model element, in our case the MarkupTransaction record list
- Click the Bind button → data model element becomes bold, as a sign that it is mapped to a data source
Now the MarkupTransactions record has a specified data source, but its fields don’t. So, we expand the MarkupTransaction record and bind its fields to the corresponding fields from the MarkupTransWithFilter data source. We don’t need to bind all fields, but only those we want to present in the report. Below is the result of binding the MarkupTransaction fields, mapped fields are marked as bold:

It is a good habit to check your mapping by clicking the Validate button. I didn’t get any validation errors, so my new mapping should be ready for execution.
Test the ER model and model mapping configuration
How do you test your ER model and model mapping configurations? In a standard D365FO approach to Electronic Reporting, you must also modify the business document format (think of MS Excel CBD formats) and add the new data elements to your layout, then run the report and check if you get the expected results. You can already see why this can be a problem: you need to make modifications on both ends, data and form, and if you don’t get the expected results, you don’t know if the problem is in the data, in the form, or in both of them.
As opposed to that, when you plan to run your ER model through the Docentric pipeline and use the Docentric templates, you don’t need to customize the template straight away. Instead, you can intercept the report datasource after the ER model is executed and before the data is consumed by the document generator. This allows you to focus on your model mapping and once you get the required results move on to the document design.
This is the first reason why I will use the template designed with the Docentric Designer for the purpose of this article. But to be honest, I also don’t intend to go through the pain of customizing a CBD format again. I did it while preparing for our Enhanced ER-CBD webinar, where I said what I think about this experience and I hope I won’t need to do it (ever) again.
Test by inspecting the generated report datasource
How to check the generated report datasource? You need to execute the following steps:
- Make sure that a standard SSRS report execution (and consequently the Docentric pipeline) is triggered when a report runs: in Print management setup for Sales Invoice select an SSRS format as a Report format for Sales Invoice.

- Force Docentric to execute the ER model: In Docentric report setup, configure the Sales Invoice report to use an ER-based template.
Notice that Docentric CBD Replicas are also available! You already know how our SSRS Replicas have set you on a fast track when you started learning Docentric. We wanted to enable the same experience with ER, which is why we made sure that the most important CBD Replicas are there for you.

- Specify the ER model and model mapping to be executed by Docentric:
- In Docentric report setup for the Sales Invoice report select Settings > Data source > Configurable business documents.
- In the Configurable business documents settings form select your ER Data model and ER Model mapping. In the example below, I have selected the ER model and model mapping I derived from the original Microsoft configurations and customized in accordance with the requirement.

- Force the generation of DDSP file:
- In Docentric report setup for the Sales Invoice report select Settings > Data source > Generation options
- Turn on the option Generate DDSP when report runs, optionally specify additional Preview languages
- Generate the DDSP file: find one Sales Invoice with line charges and print it once, for example as Original preview. As a result, you will see the report printed by using the Docentric ER replica template, and a DDSP file generated and downloaded into your Downloads folder:

- Open the DDSP file and inspect it. It should contain the newly mapped records MarkupTransaction as sub-elements of InvoiceLines records. The values in MarkupTransaction records should match the values in the Sales Invoice used for printing.


Customize the Docentric template
Now we know that the Sales Invoice ER model mapping is correctly customized. The final touch is to customize the Docentric template and bring the charges information to design. It is as simple as executing the following steps:
- Download and open the existing Sales Invoice ER replica.
- Import the new DDSP. As a result, you will see the new datasource elements:

- Add a new list tagging element within the existing Invoice Lines list and bind it to the MarkupTransaction collection.
- Add the field tagging elements within a list of markup transactions, with the content you want to display in the report (yellow row in the image below):

- Apply the new version of template instead of the original and print report:


Once we have the necessary data in the report datasource, we can further play with it, for example add a summary charges table:

You can conditionally print this new table only if there are some charges, or you can also conditionally print the charges specification only if there are charges on a line, and so on, but the point is: you can do it in a few minutes, immediately see the result in Live Preview pane, fine-tune the layout and apply the new design in your production environment as well.
Summary
In this article we demonstrated how to add the charges to D365FO Sales Invoice lines through the combination of Electronic Reporting and Docentric.
We explained how to analyze the standard ER model mapping and identify the data source records that represent the sales invoice lines. We demonstrated how to link the charges transactions to the lines. Then we saw how simple it is to intercept the data and verify that it contains the newly bound charges transactions with the correct values. We finally demonstrated adding the charges to the Docentric layout.
And best of all? We can do it all in less than 10 minutes!
Resources
On the link below, please find the resulting Docentric template and used ER configurations.
Download resources >>
Hi Sanja
Thanks for this article, it worked perfectly for me. In the article you mention there will be a separate walk through for charges on Proforma invoices, was this ever produced?
Thanks
Hi Dean,
Thanks for the follow-up 😀. Unfortunately, not yet!
It’s on our TODO list, but you know, this list getting bigger every day 😋
Subscribe to our Blog (a newsletter) or follow us on LinkedIn to stay in touch – if you feel so.
Kind regards,
Ana
Hi Dean,
To print the charges for pro-forma, this can be achieved by adding a link to the SalesLine table between the CustInvoiceTransTable and the markupTransRecords.
– Add SalesLine as a Table record, this will allow you to use the static method findInventTransId() in a calculated field.
– Get the related SalesLine by using the SalesLine::findInventTransId() method with $CustInvoiceTransFromTableDef.InventTransId as a parameter (you can also use @.InventTransId) in a calculated field. You can call this $SalesLineFromTableDef for example.
– Get the charges by relating the to the SalesLine instead of the CustInvoiceTrans: TABLENAME2ID(“SalesLine”) instead of TABLENAME2ID(“CustInvoiceTrans”), @ must refer to $SalesLineFromTableDef here to use the RecId from the correct table (SalesLine).
Make sure to create all this in the correct hierarchy, so your “@” will always refer to the correct item.
– SalesInvoiceTmp_Lines -> $CustInvoiceTransFromTableDef -> $SalesLineFromTableDef -> $MarkupTransWithFilter